Jetson AGX Orin 配置
记录下对Nvidia机载电脑Jetson AGX Orin的配置过程:
- 使用SDKManager docker镜像刷JetPack高版本(5.x版本能直接识别带有IMU的设备, 而6.x版本需要使用uvc后端且无法识别带IMU的设备)
SDKManager刷机
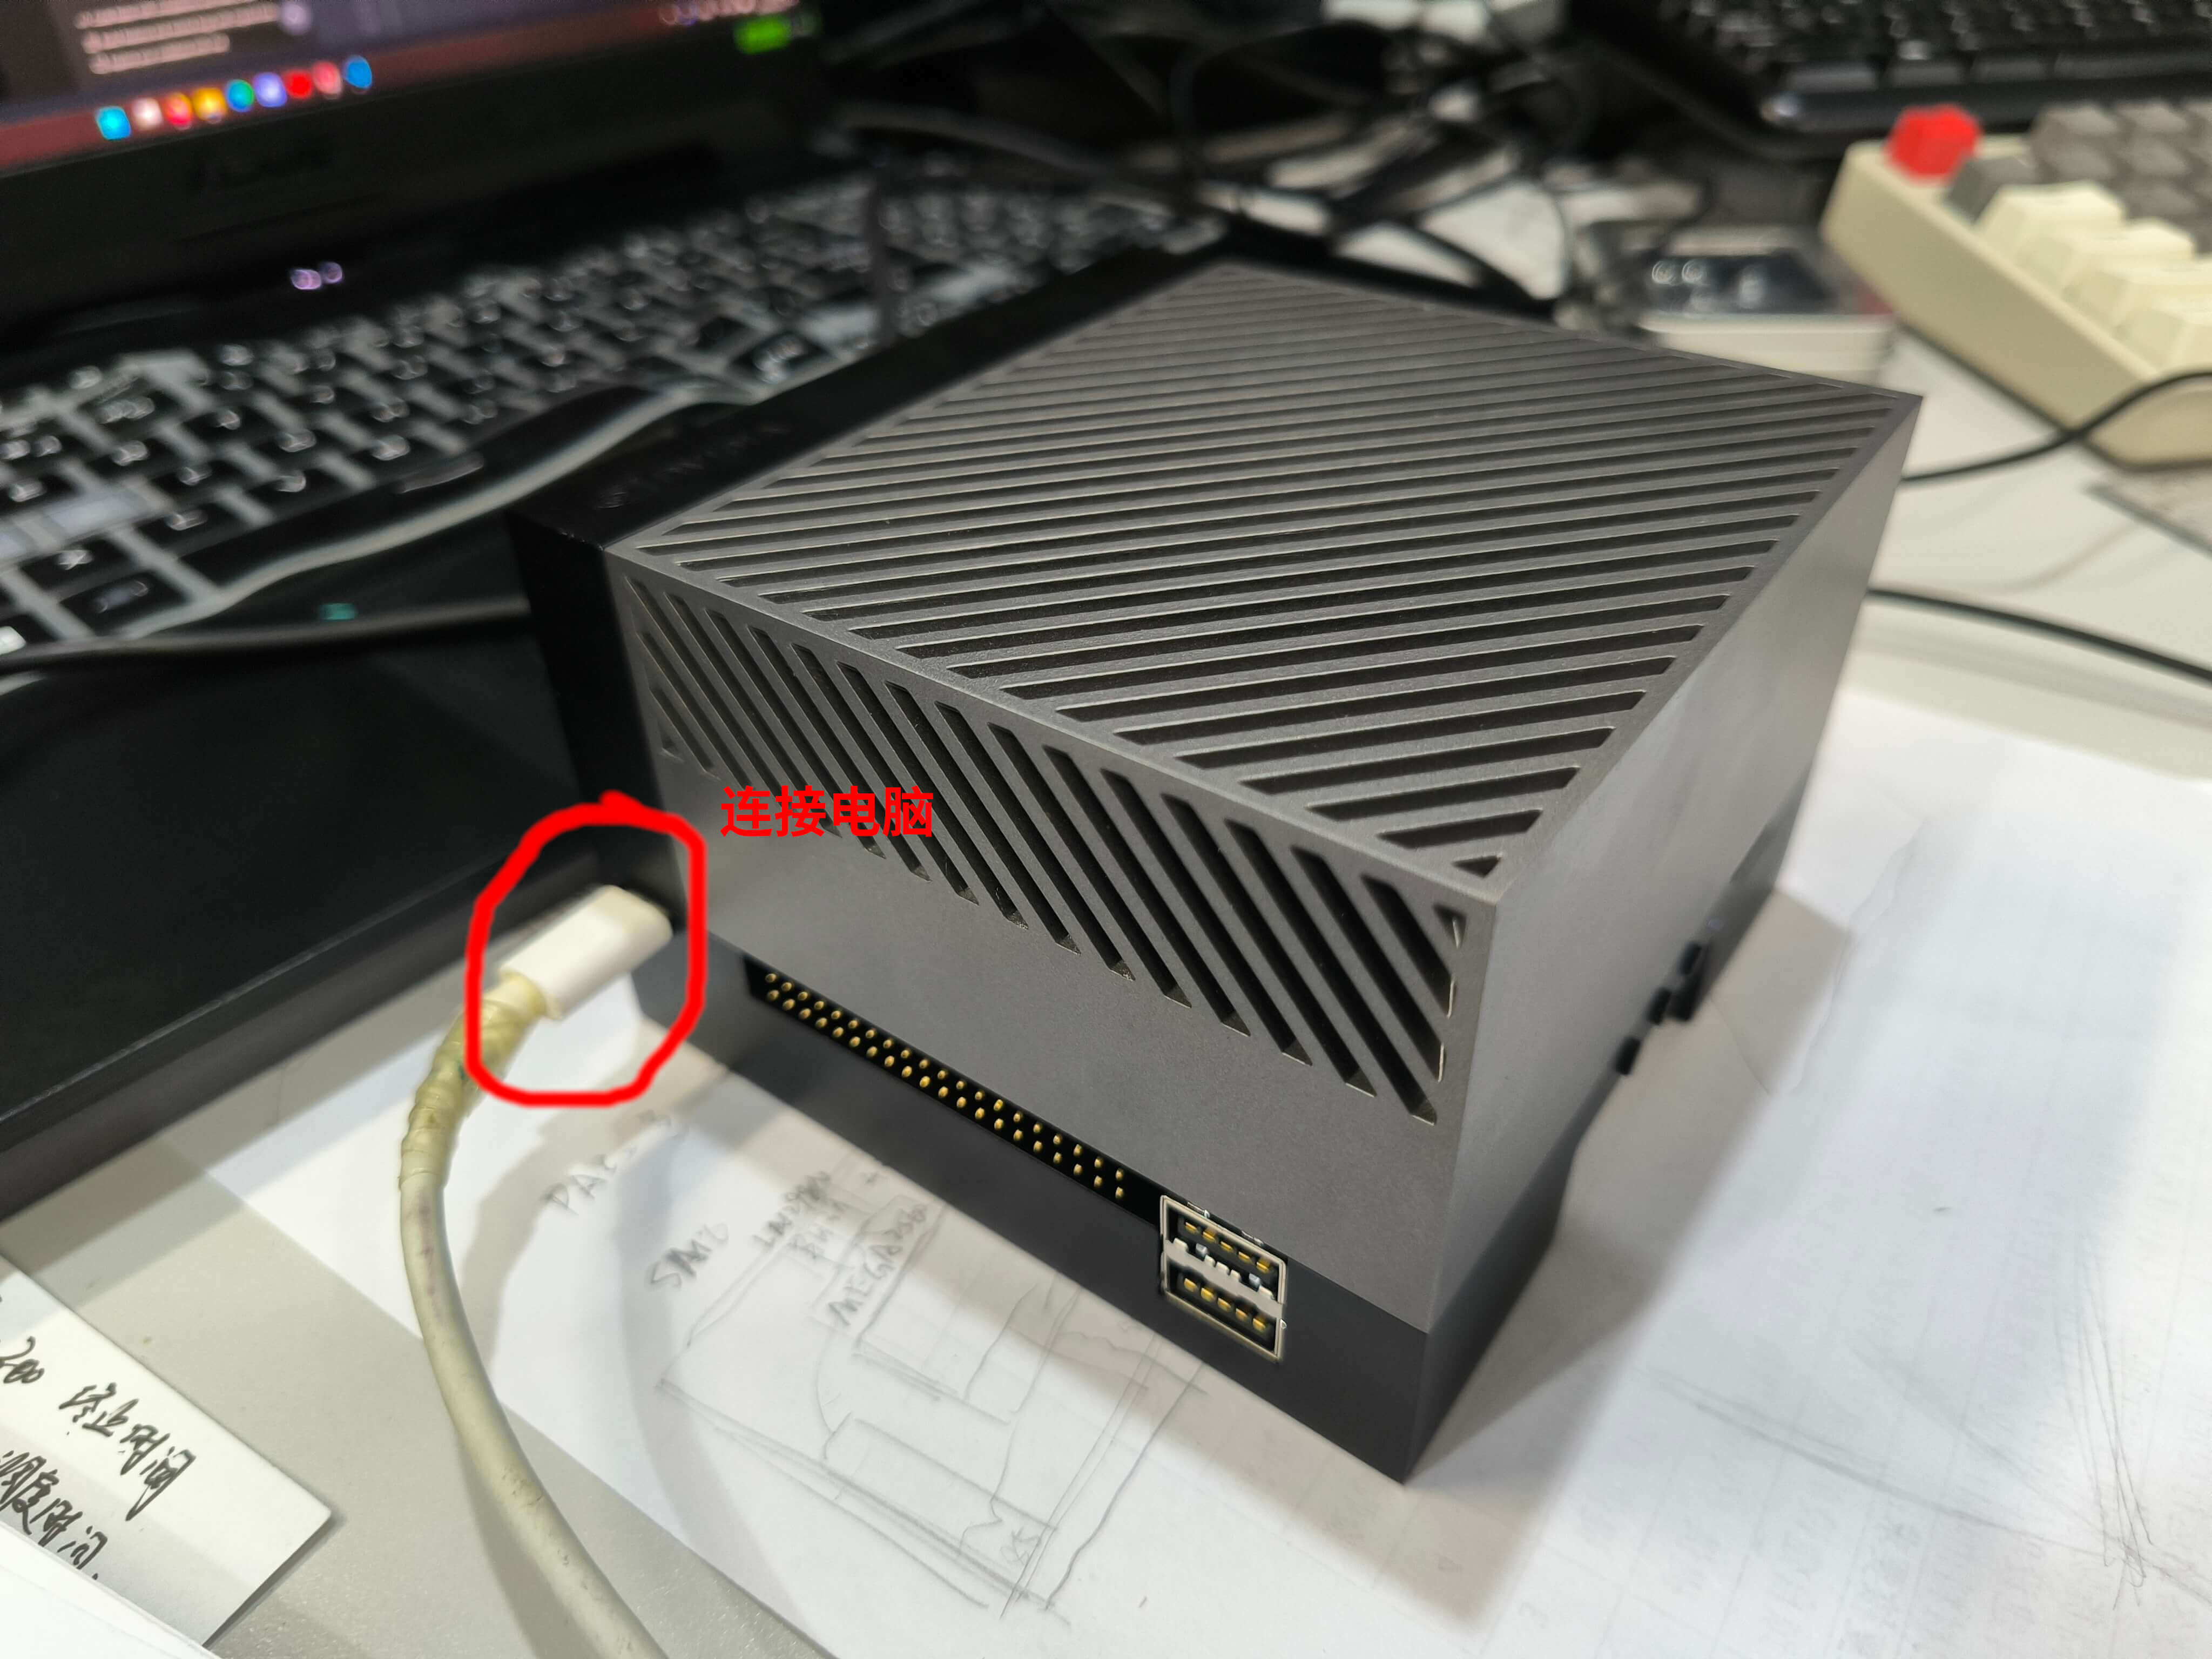
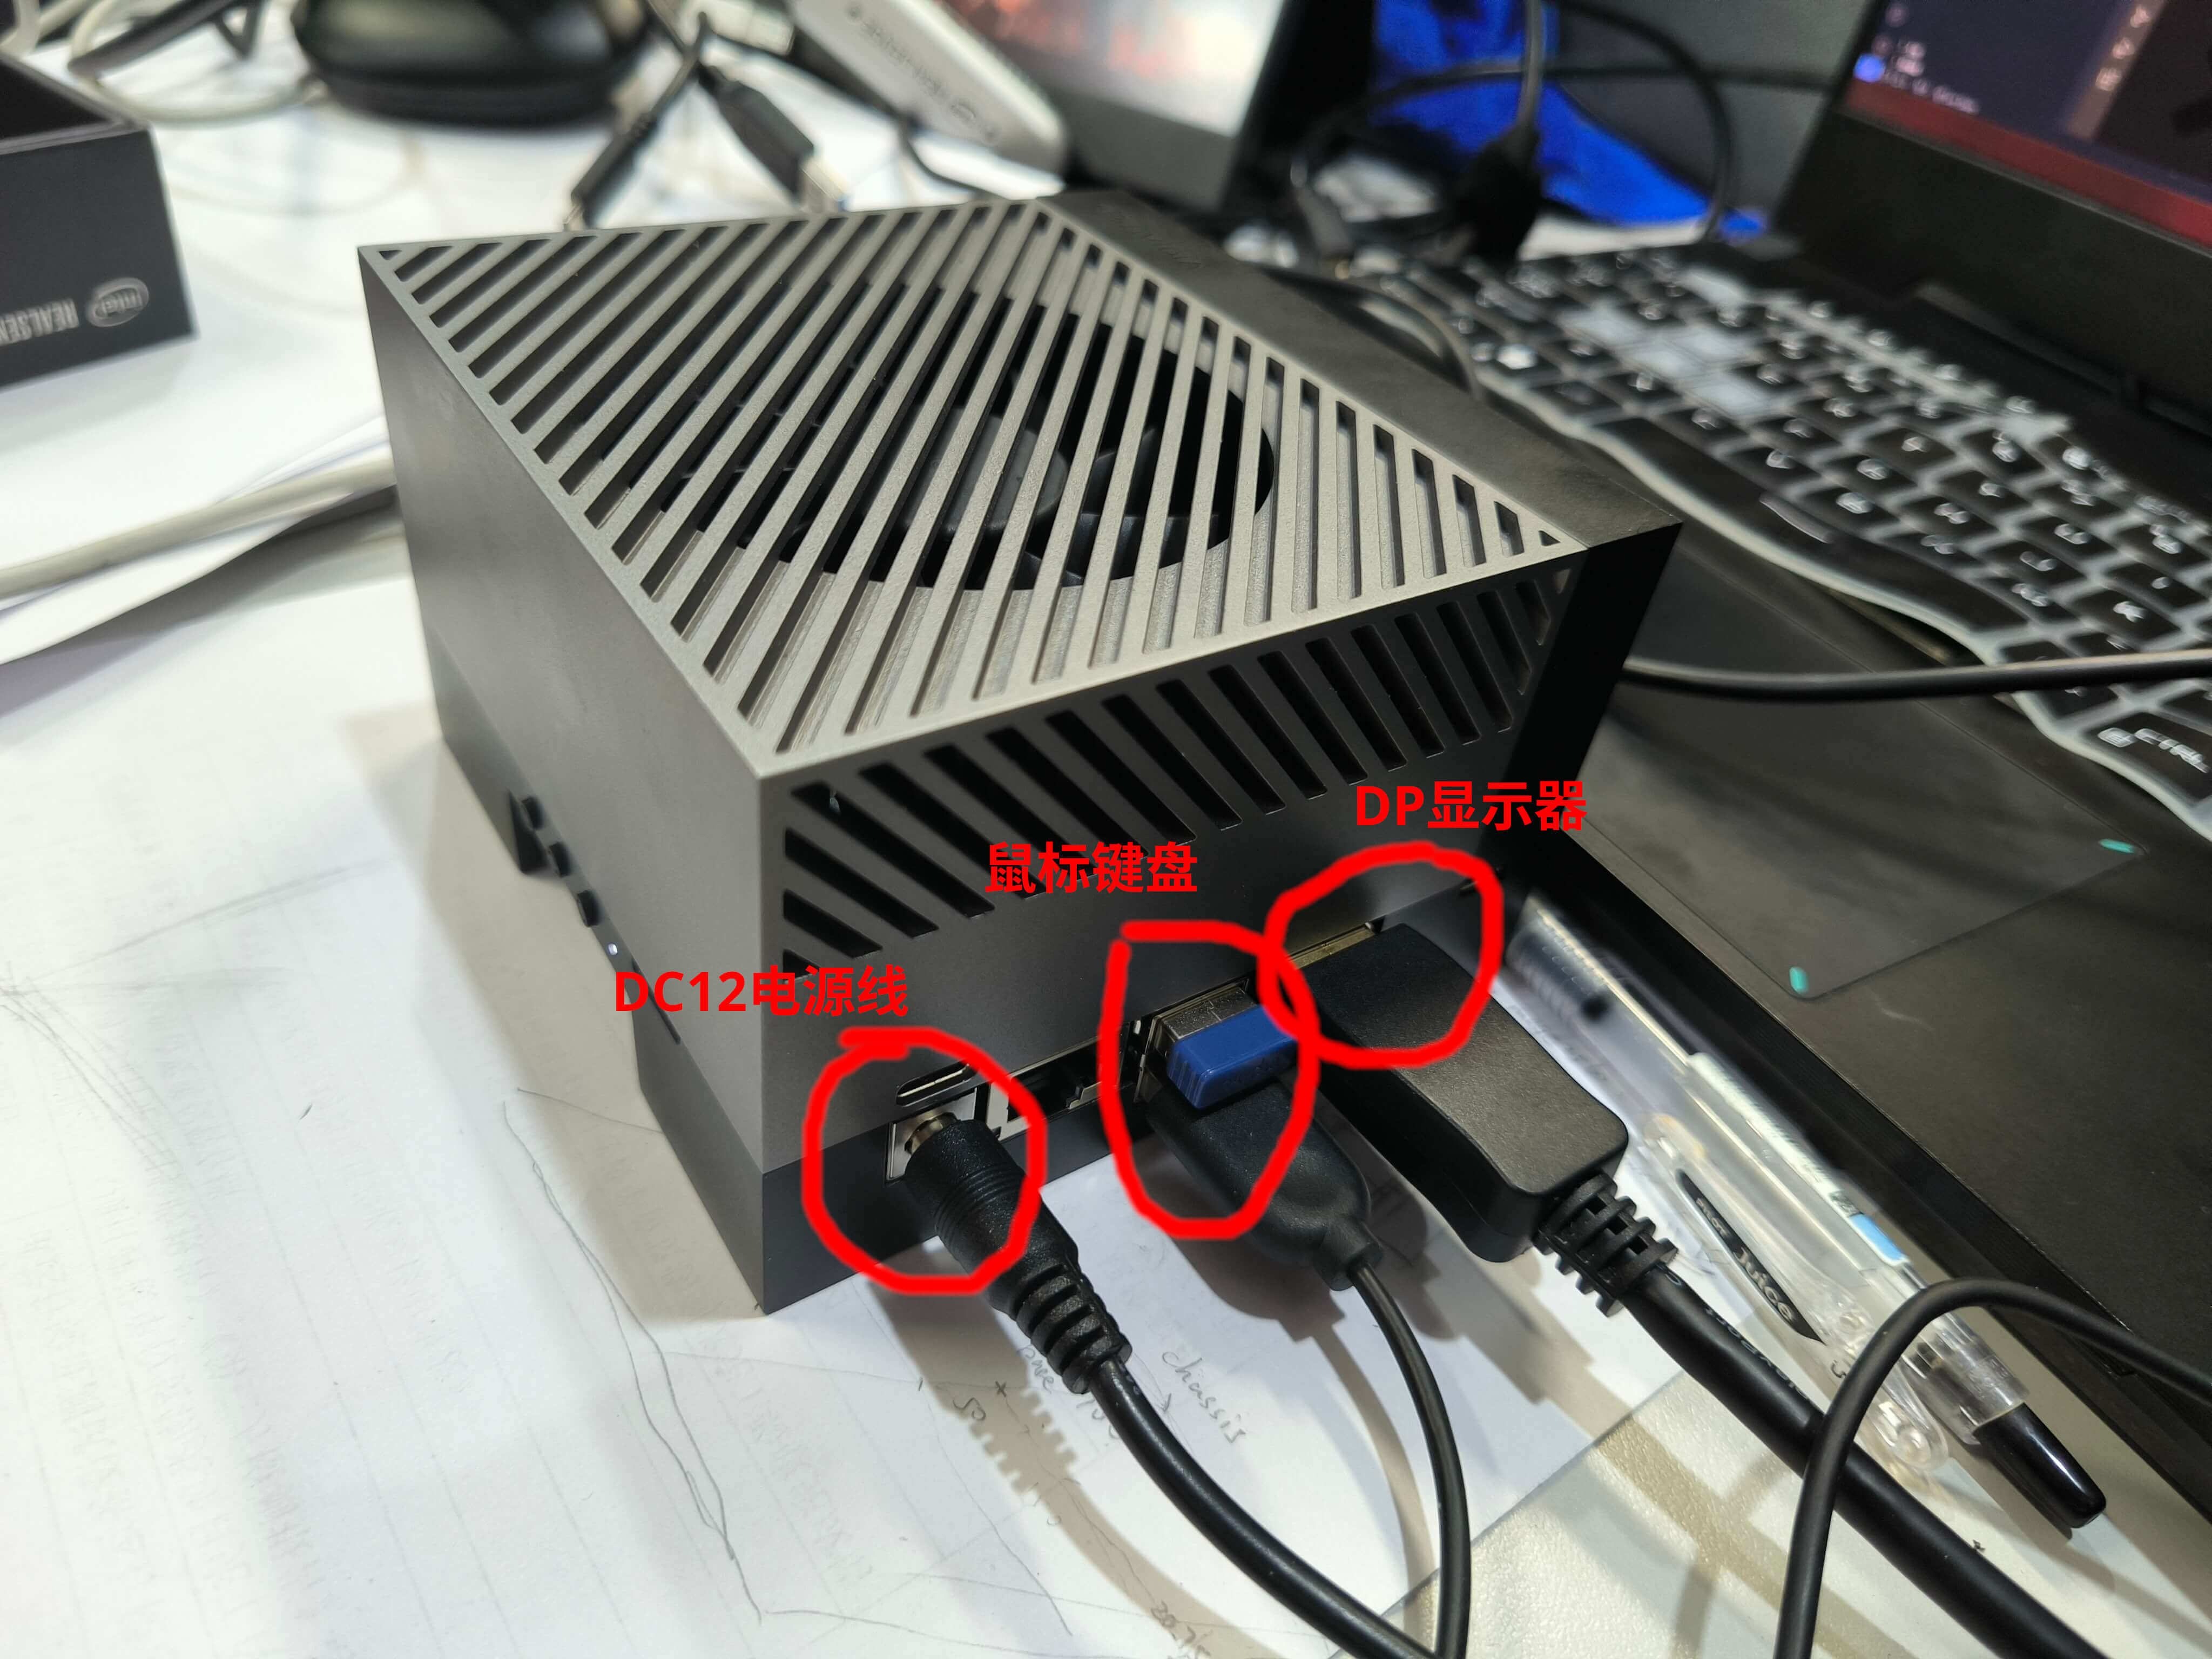
这里需要一条DC 12V的电源线,用来给AGX供电,还需要另一台带有Docker的电脑用来刷机,接线如下所示:
| 先接上电脑(白线) | 再接上电源 |
|---|---|
 |
 |
如果进入了显示界面说明没成功进入刷机,关机后拔掉DC电源线,按住中间的按钮,插上中间的电源线,如果屏幕没有亮松开按钮,在电脑上输入lsusb可以看到一行NVIDIA Corp. APX信息,说明成功进入恢复模式。 |
如果没有12V DC直流电源线,使用type-C电源线插到DC插口上方的type-C接口上也是可以的。 |
可视化窗口安装
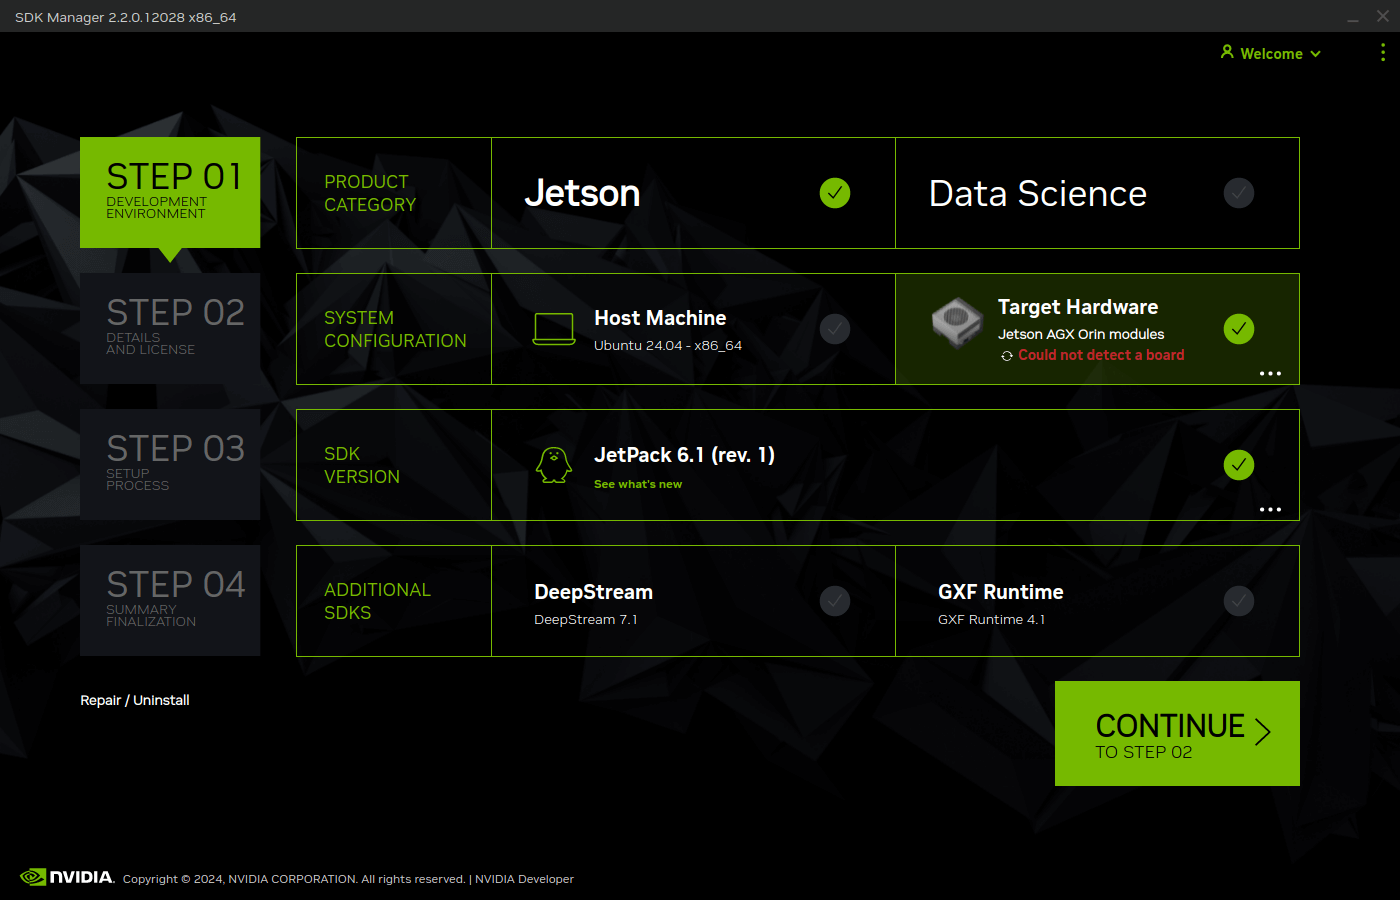
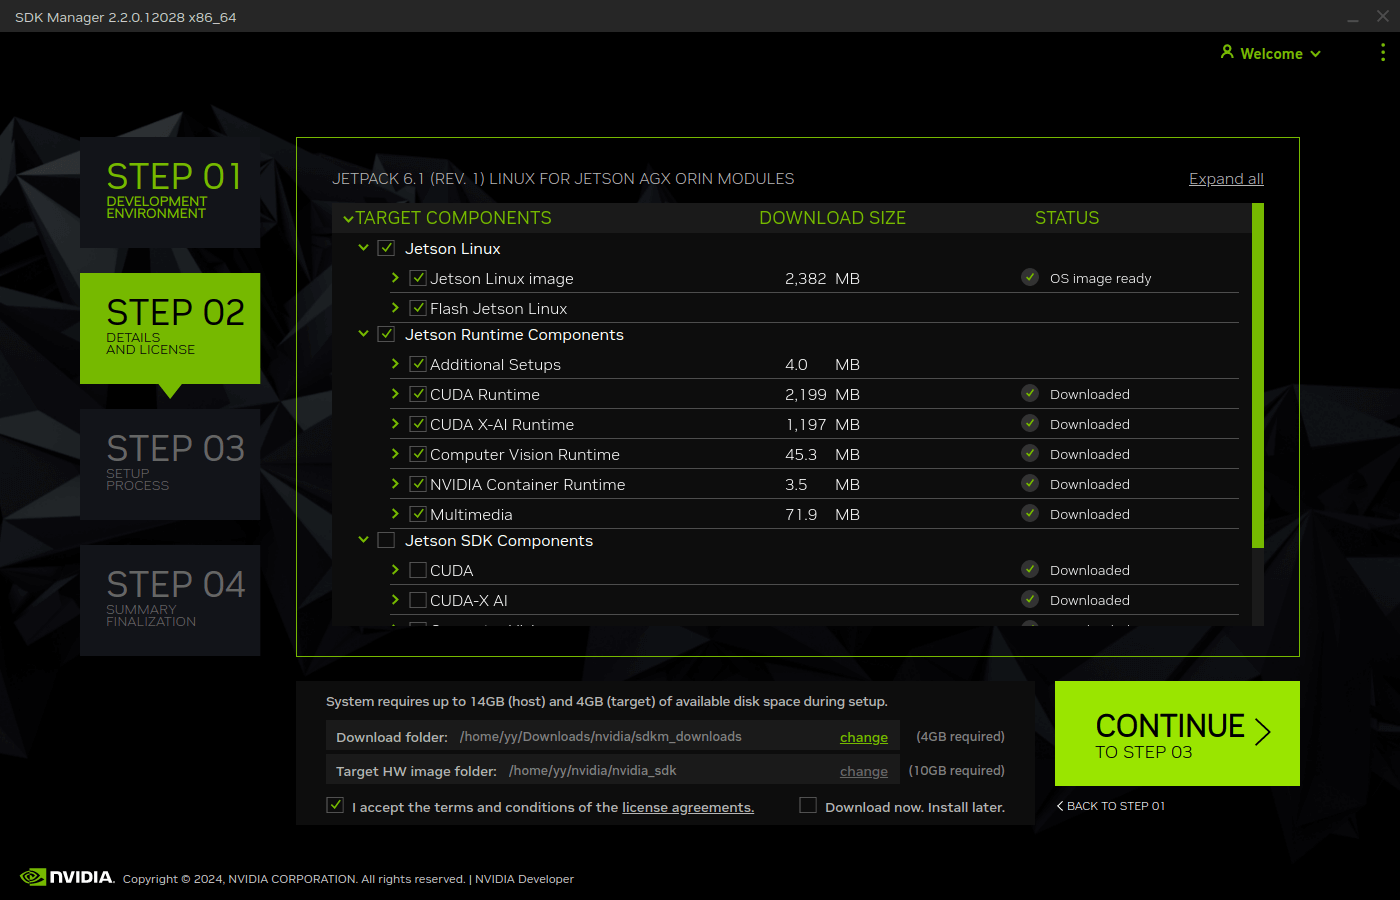
进入skd-manager下载界面点击.deb Ubuntu下载并安装在主机上,安装完成后,终端输入sdkmanager即可打开可视化窗口(如果打不开尝试sdkmanager --no-sandbox)
| STEP01 | STEP02 | STEP03 |
|---|---|---|
 |
 |
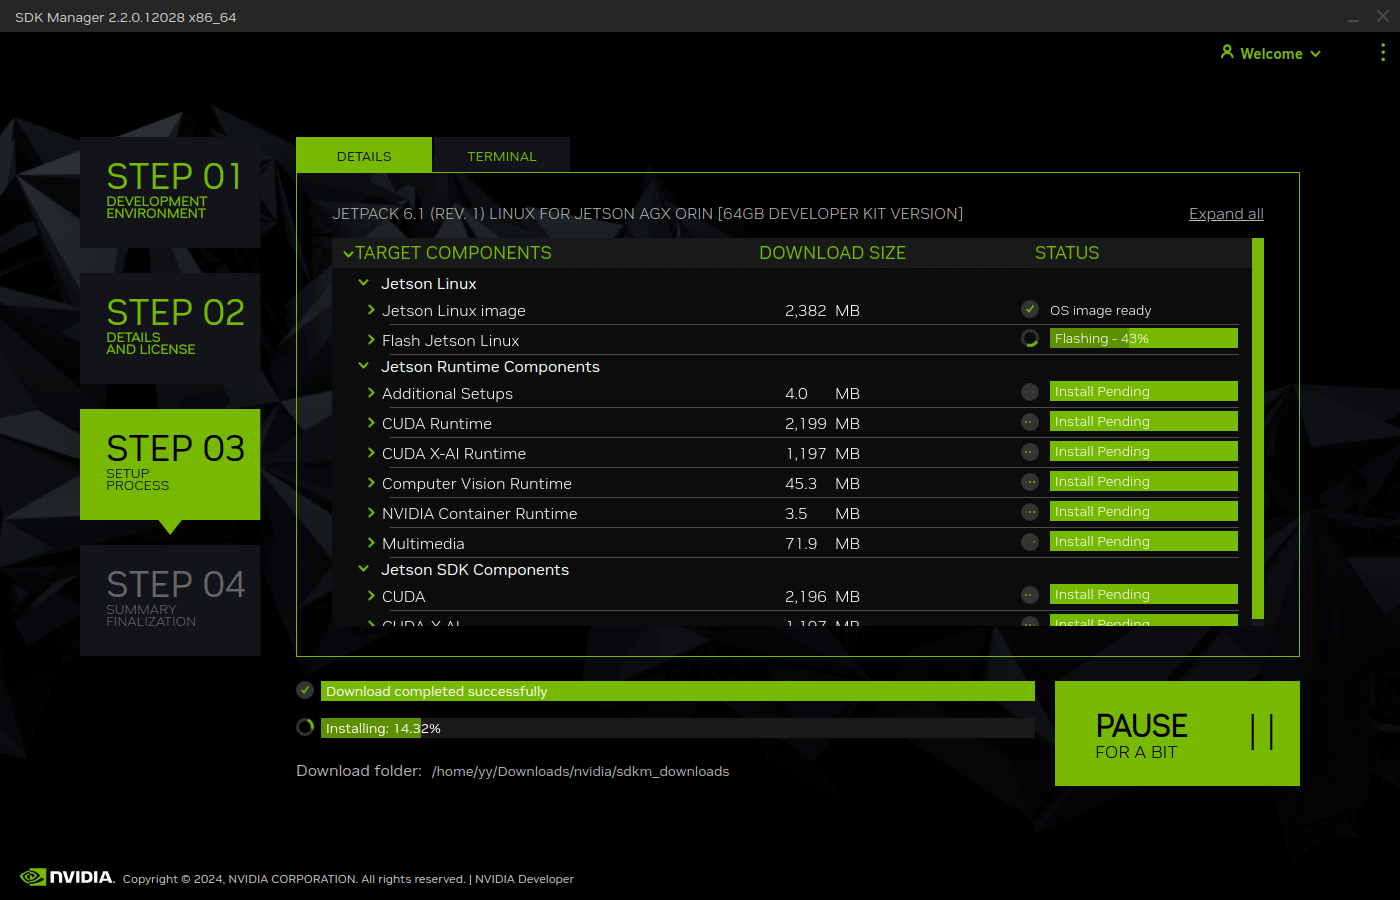 |
| 连接上AXG,选择要刷的版本 | 选择要安装的程序 | 设置用户名与密码开始刷机 |
Docker CLI 安装5.1.4
由于我的host主机是Ubuntu24.02,无法安装5.1.4,必须用镜像,推荐用可视化窗口安装
进入skd-manager下载界面,下载Docker Image Ubuntu18.04 (20.04)也可以安装JetPack 5.x,下载完成后加载镜像,并重新命名为sdkmanager:
docker load -i sdkmanager-[版本号]-Ubuntu_18.04_docker.tar.gz
docker tag sdkmanager:[版本号]-Ubuntu_18.04 sdkmanager:latest参考SDK Manager - Docker Images中的教程,执行如下命令行就可以安装5.1.4版本的了,如果不是AGX型号,修改--target JETSON_AGX_ORIN_TARGETS为对应的型号(全部支持的型号参考SDK Manager - target-device)
docker run -it --privileged \
    -v /dev/bus/usb:/dev/bus/usb/ -v /dev:/dev -v /media/$USER:/media/nvidia:slave \
    --name JetPack_AGX_Orin_Devkit --network host \
    sdkmanager --cli --action install --login-type devzone \
    --product Jetson --target-os Linux --version 5.1.4 \
    --target JETSON_AGX_ORIN_TARGETS --flash --license accept \
    --stay-logged-in true --collect-usage-data enable --exit-on-finish
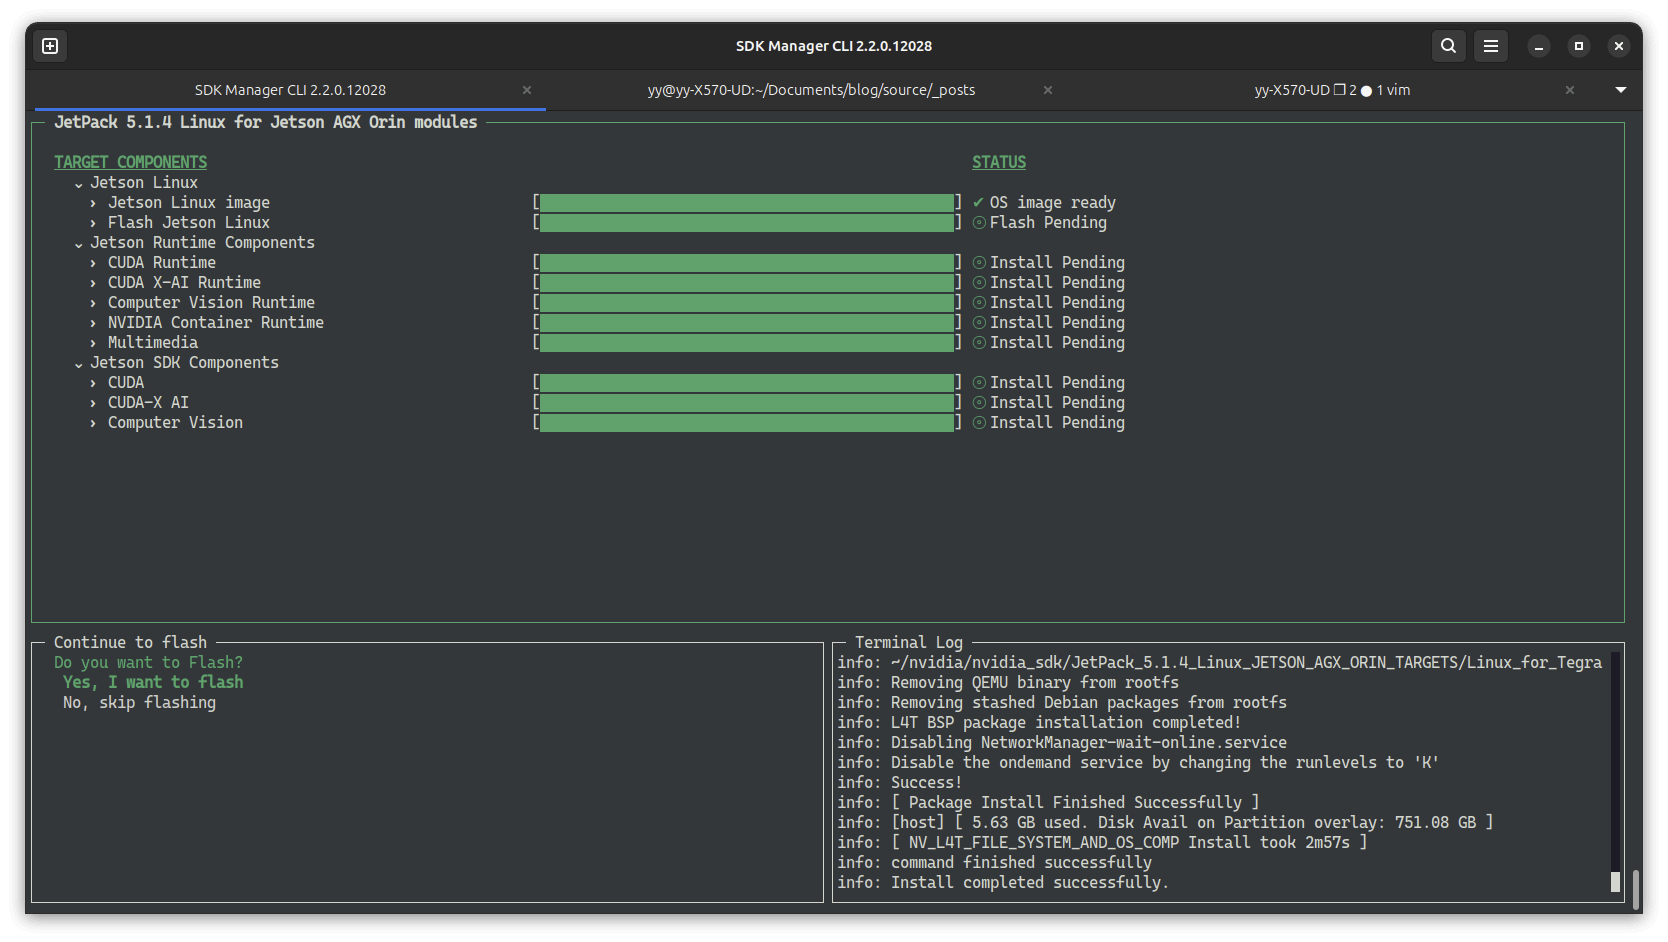
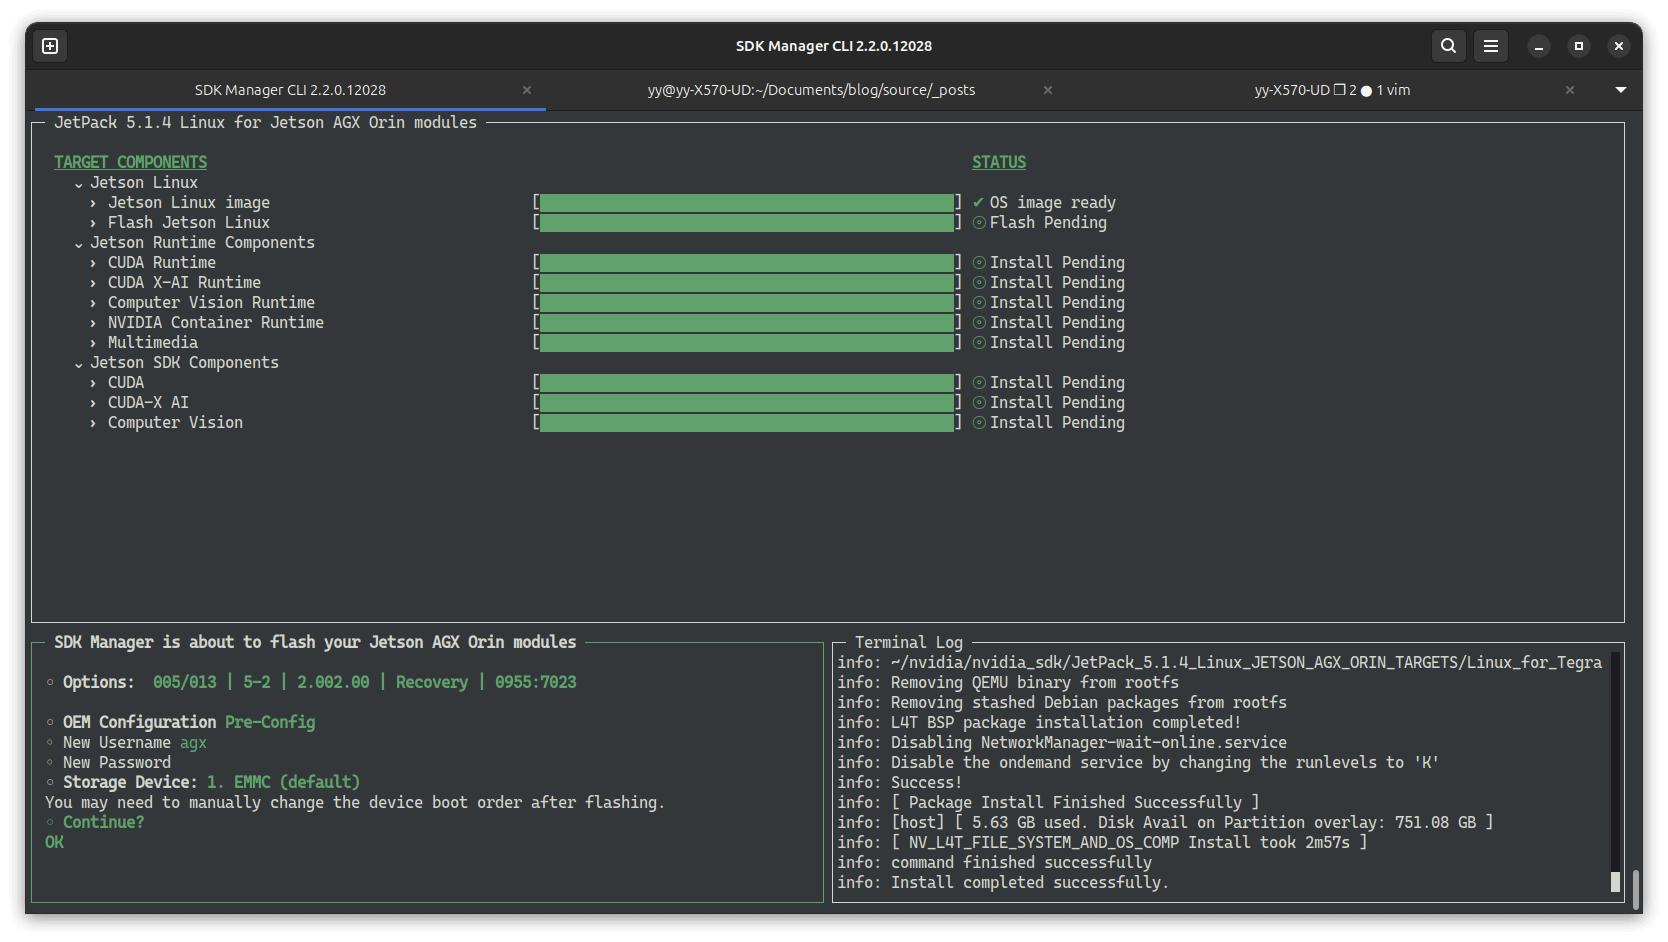
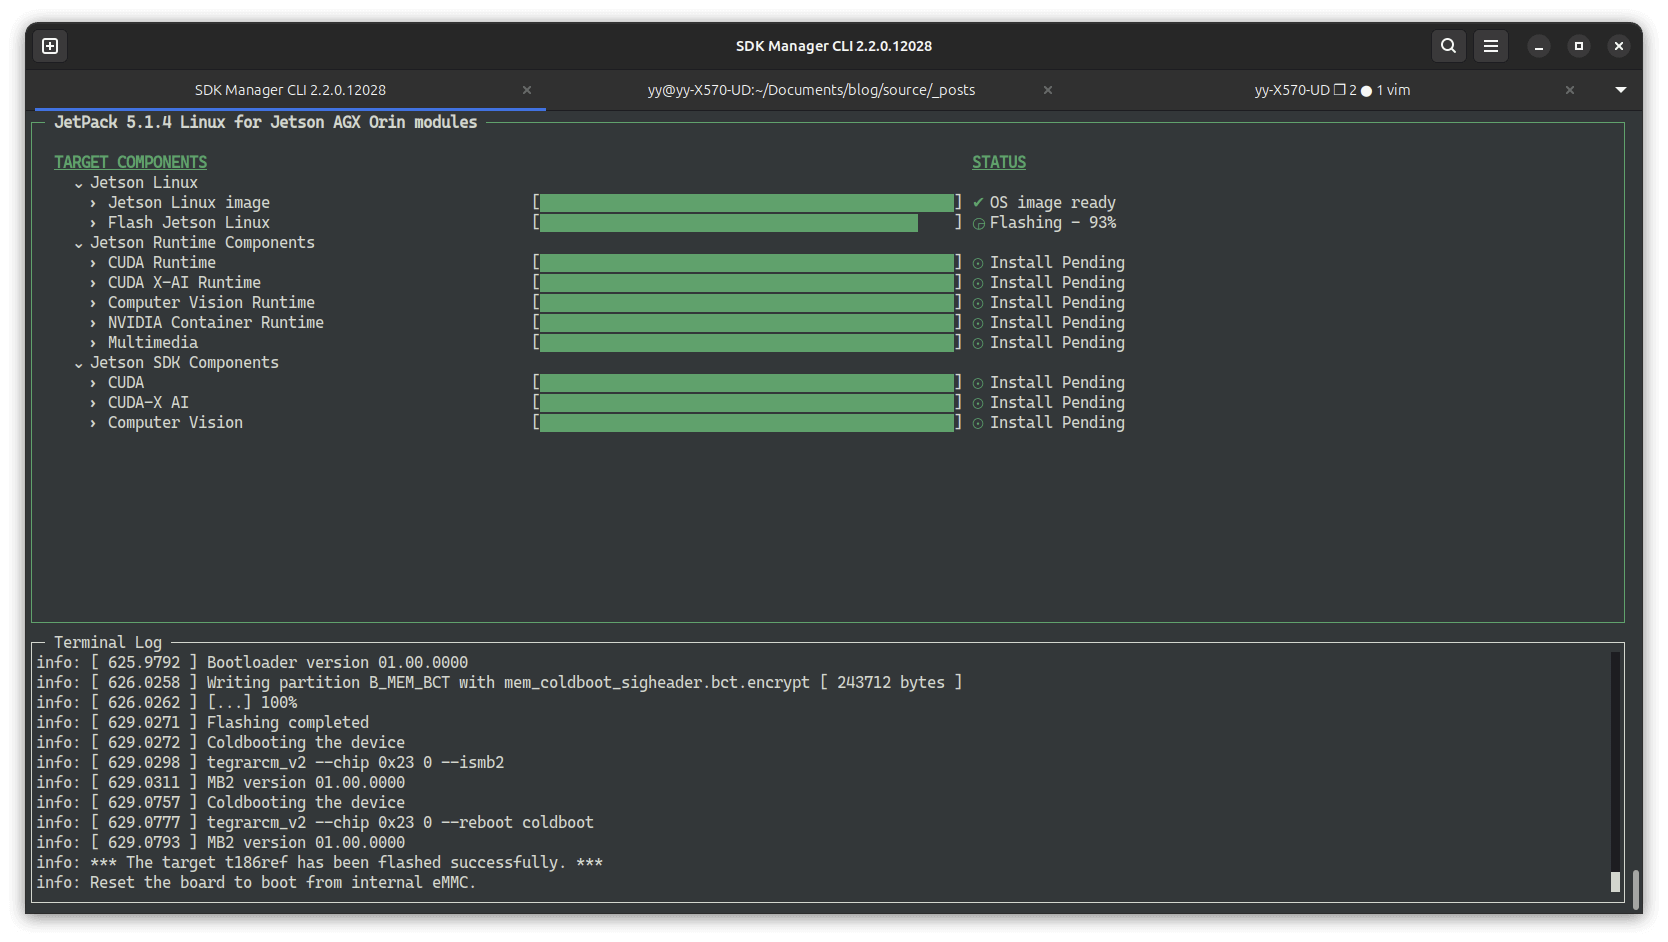
这部分主要分为两步,下载部件,烧录Ubuntu系统
| 自动开始部件下载,选择开始烧录 | 设置用户名,密码,其他默认选项 | 烧录系统,等待完成 |
|---|---|---|
 |
 |
 |
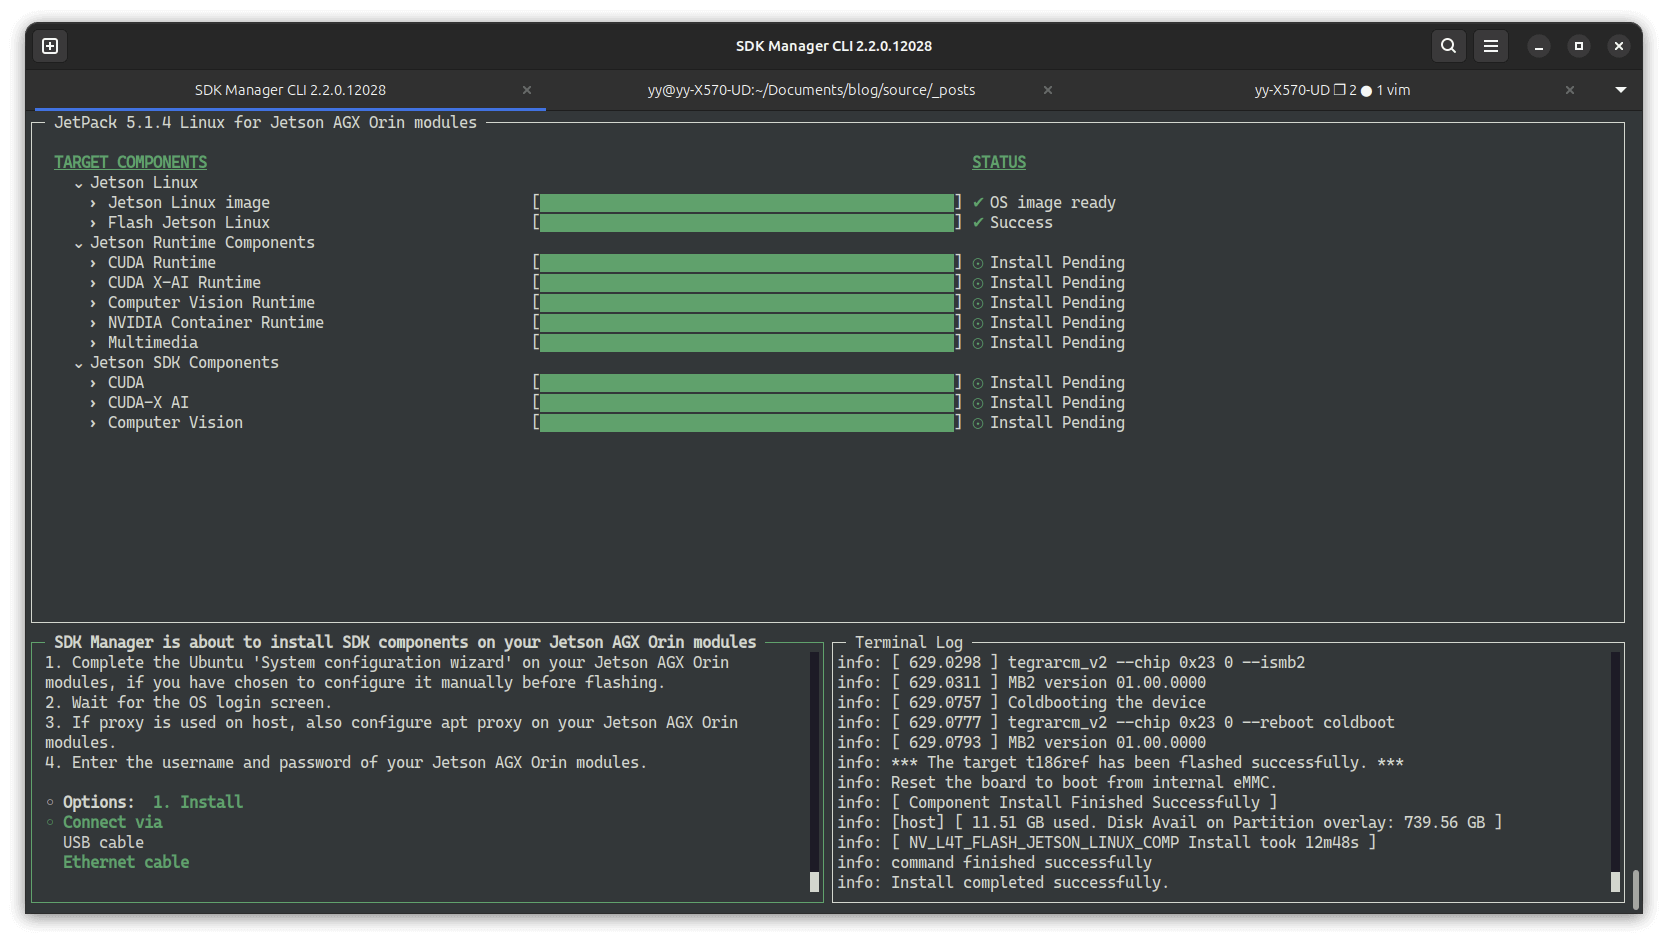
系统烧录完成后显示屏会亮起,输入用户名密码进入Ubuntu系统,连接和电脑的局域网(用热点也行),进行第二部分安装
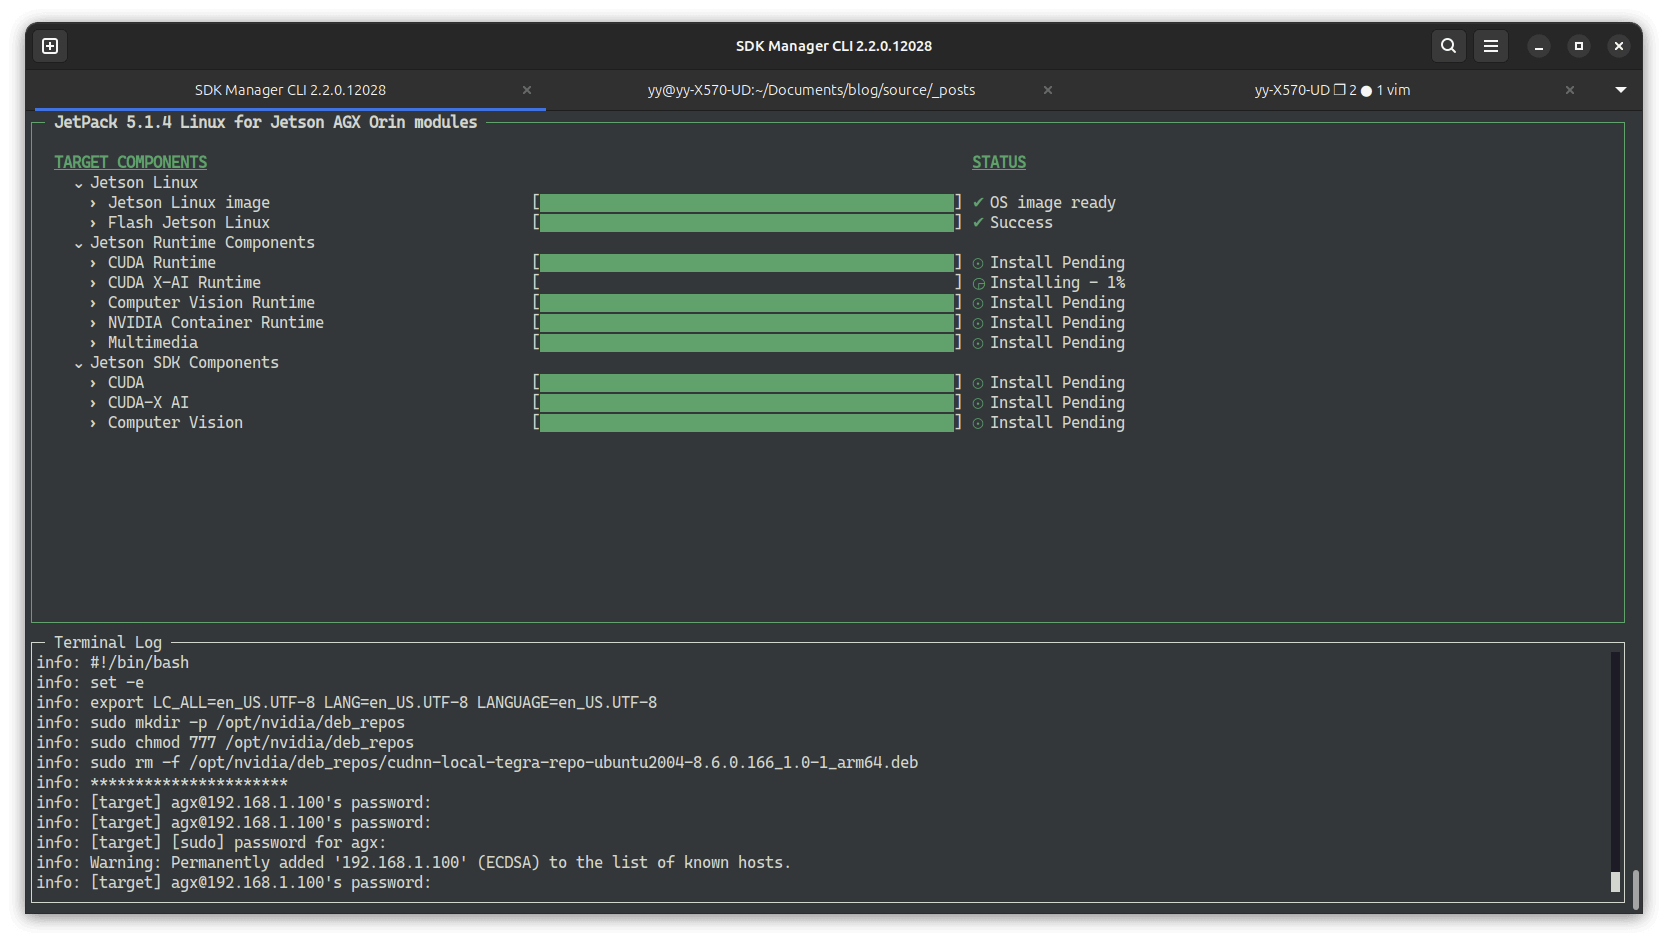
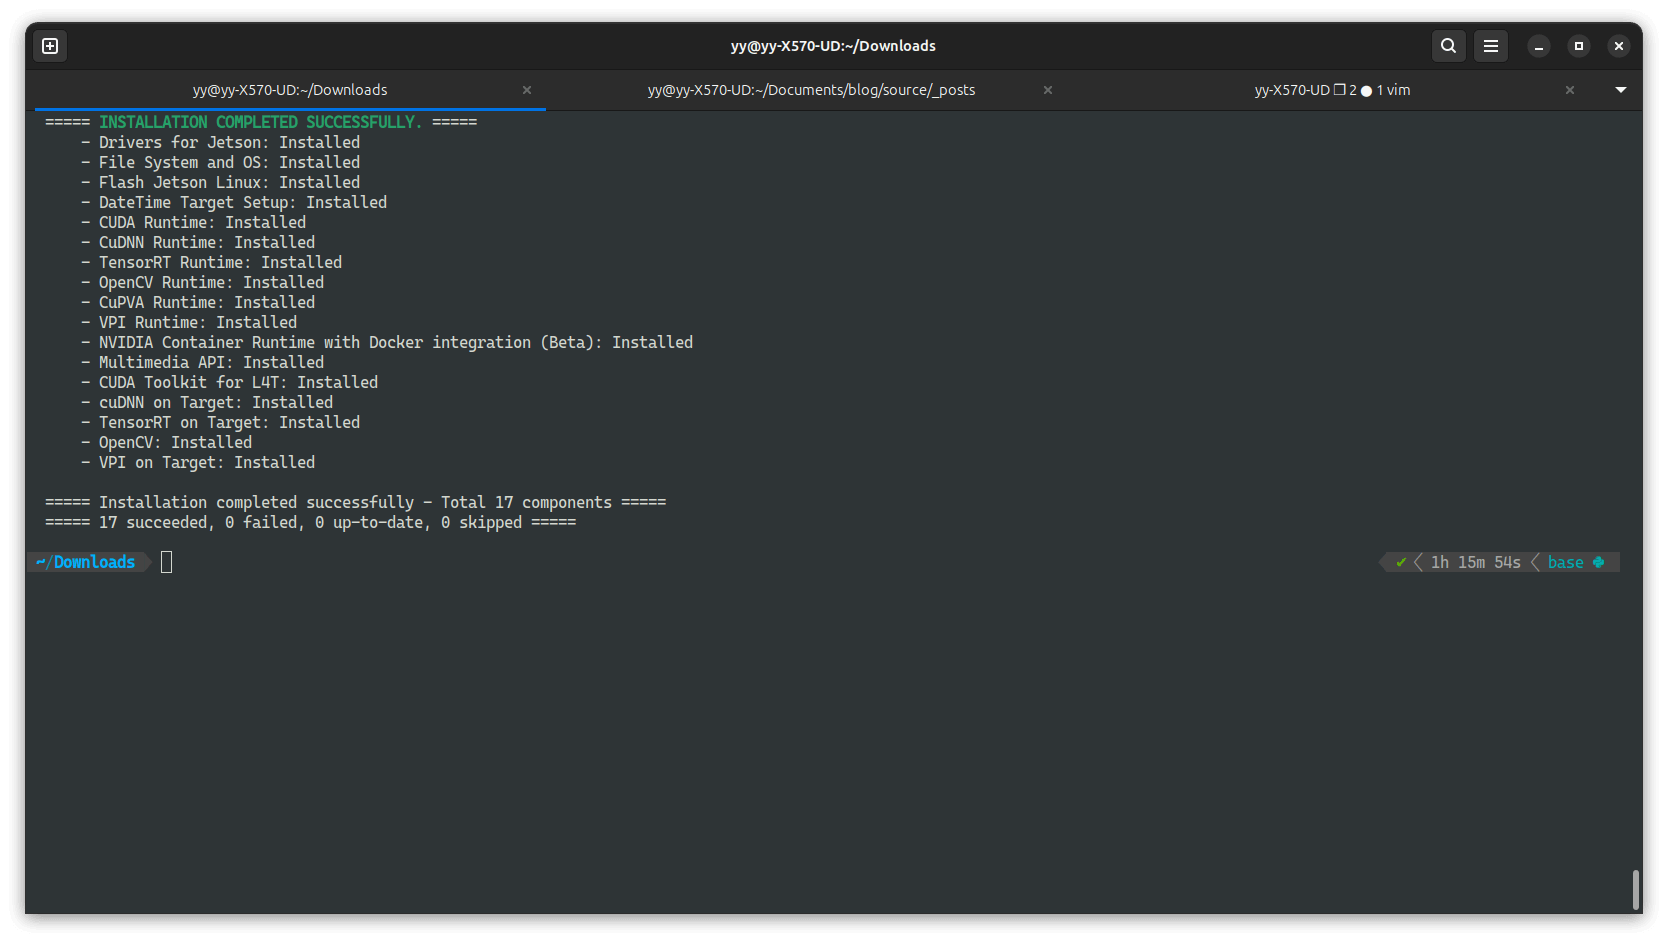
| 选择Install,选择Ethernet cable,IPv4,输入AGX的IP | 开始自动安装第二部分(CUDA等) | 安装完毕! |
|---|---|---|
 |
 |
 |
完成安装后我们可以保存本次下载的容器为镜像
docker commit JetPack_AGX_Orin_Devkit jetpack_agx_orin_devkit:5.1.4_flash下次如果还要刷机直接启动本次镜像即可
docker run -it --rm --privileged -v /dev/bus/usb:/dev/bus/usb/ jetpack_agx_orin_devkit:5.1.4_flashRealSense SDK & ROS 安装
JetPack 5.x
直接按照官网的安装方法安装即可: 4. Install with Debian Packages
安装完成后执行realsense-viewer插上摄像头即可看到图像(IMU也可以识别)
JetPack 6.x
参考realsense官方人员给出的回复(帖子),因为包含IMU摄像头为HID设备,需要MIPI驱动,安装这个驱动非常麻烦,参考realsense_mipi_platform_driver,基本没有仍和参考文档,根本装不上。
帖子下方给出了另一个很好的方法,基于libuvc_installation.md安装UVC后端的realsense即可,三行即可解决
wget https://github.com/IntelRealSense/librealsense/raw/master/scripts/libuvc_installation.sh
chmod +x ./libuvc_installation.sh
# 执行安装前推荐使用全cpu编译cmake效率更高
gnome-text-editor libuvc_installation.sh
# 找到倒数第3行, make -j2 改为
make -j${nproc}
# 保存退出
# 开始安装
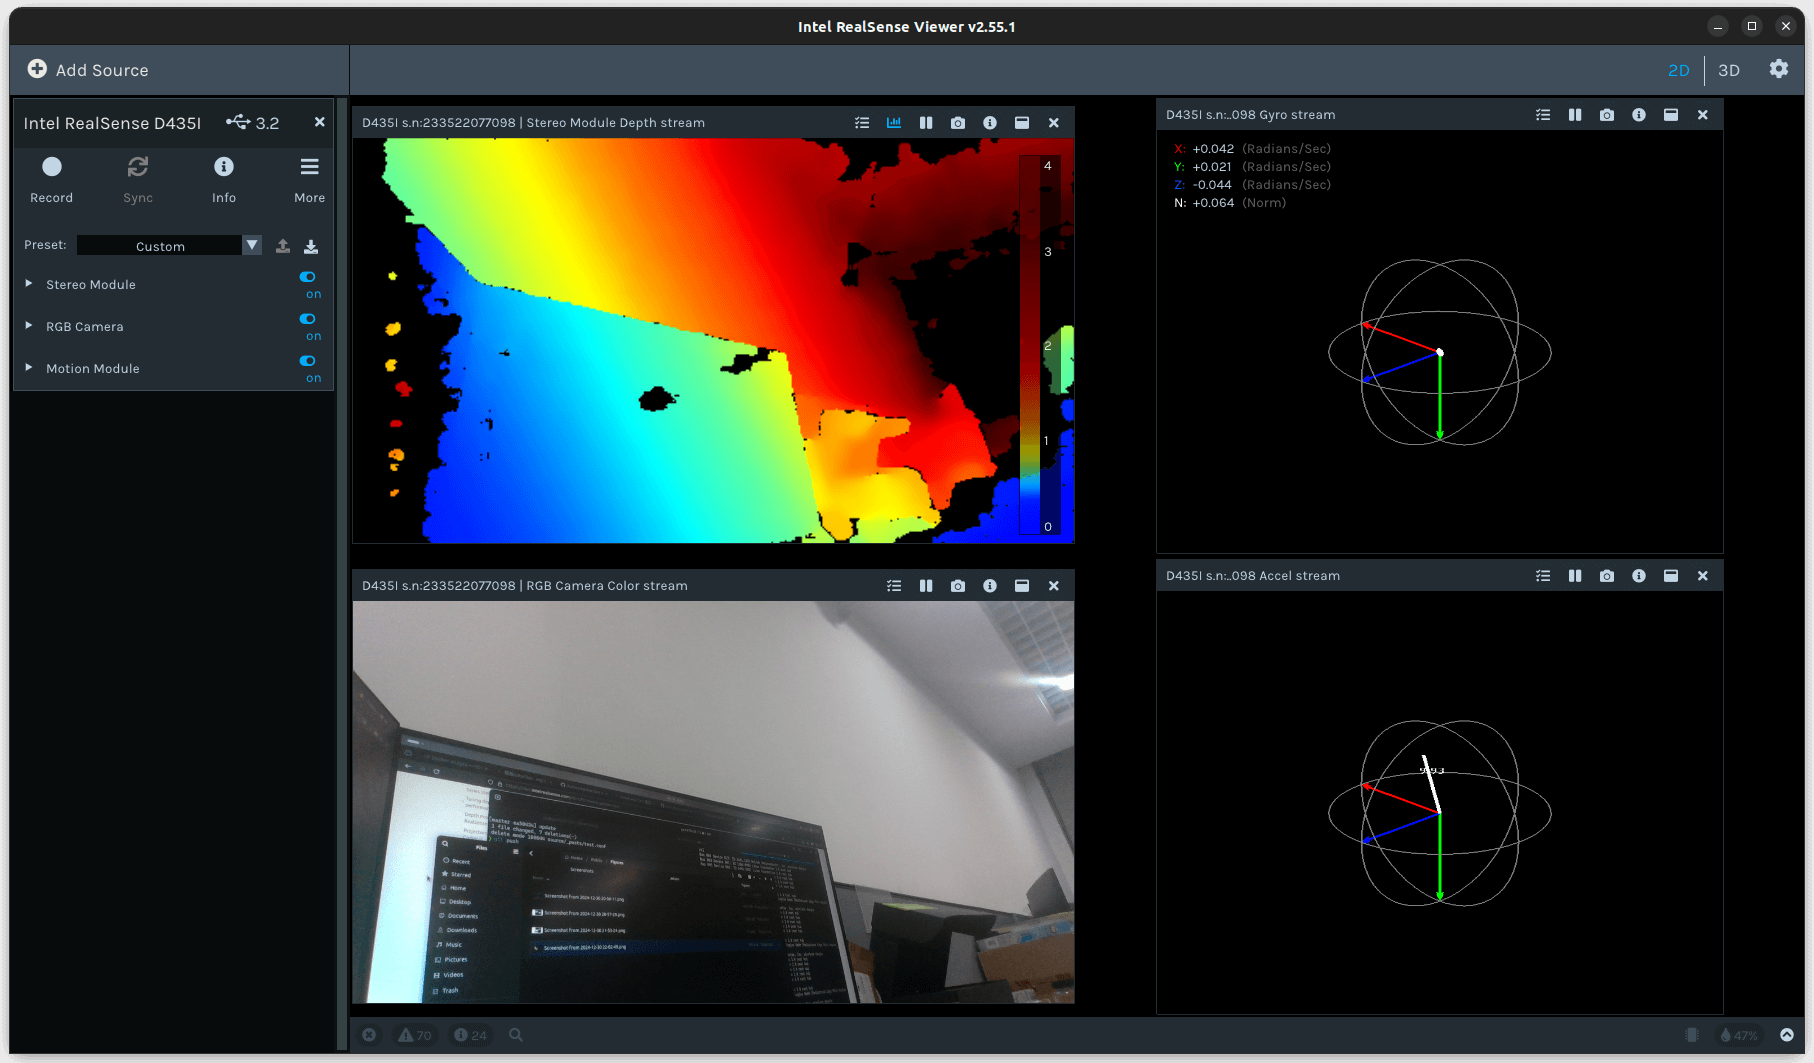
./libuvc_installation.shD435i的IMU读取方法,如果直接打开realsense-viewer还是无法读取IMU数据,一读取就会报错,解决方法就是将相机的Firmware降级到适配你相机的最低版本,参考D455 Errors when activating imu stream in rs-viewer中的一条回复,方法很简单,先在Firmware releases D400找到你相继对应的最低驱动版本,例如我的D435i就是Version-5_12_7_100,下载解压得到*.bin文件,通过Firmware Update Tool安装教程(安装librealsense时候就附带安装了)安装
rs-fw-update  # 查看当前连接的相机驱动版本
rs-fw-update -f Signed_Image_UVC_5_12_7_100.bin # 安装驱动安装完成后执行realsense-viewer插上摄像头即可看到图像🥰(还可以看到IMU哦)
ROS2中启动realsense相机节点
我安装的ROS2版本为humble,直接按照官方给出的教程Ubuntu-Install-Debs即可轻松安装
完成ROS2安装后,参考No RealSense devices were found! 中的评论,必须使用源码编译方式安装才能检测到相机,参考官方realsense-ros installation-on-ubuntu Step3 Option2安装
安装colcon:
sudo apt install python3-colcon-common-extensions
如果执行sudo rosdep init报错,参考CSDN - rosdep update — The read operation timed out 解决方法 (将所有raw.githubusercontent.com前面都加上代理)
完成全部安装后,以后就不要使用source /opt/ros/humble/setup.sh了,直接使用source /home/${USER}/ros2_ws/install/setup.sh加载ROS2环境即可
参考reddit - If I use ros2 built from source, can I use “sudo apt install ros-distro-package” to install packages??发现ROS2貌似不支持将自己编译的包,安装到root环境下,通过
ros2_ws/install/setup.sh即可初始化整个ROS2环境+自定义包了
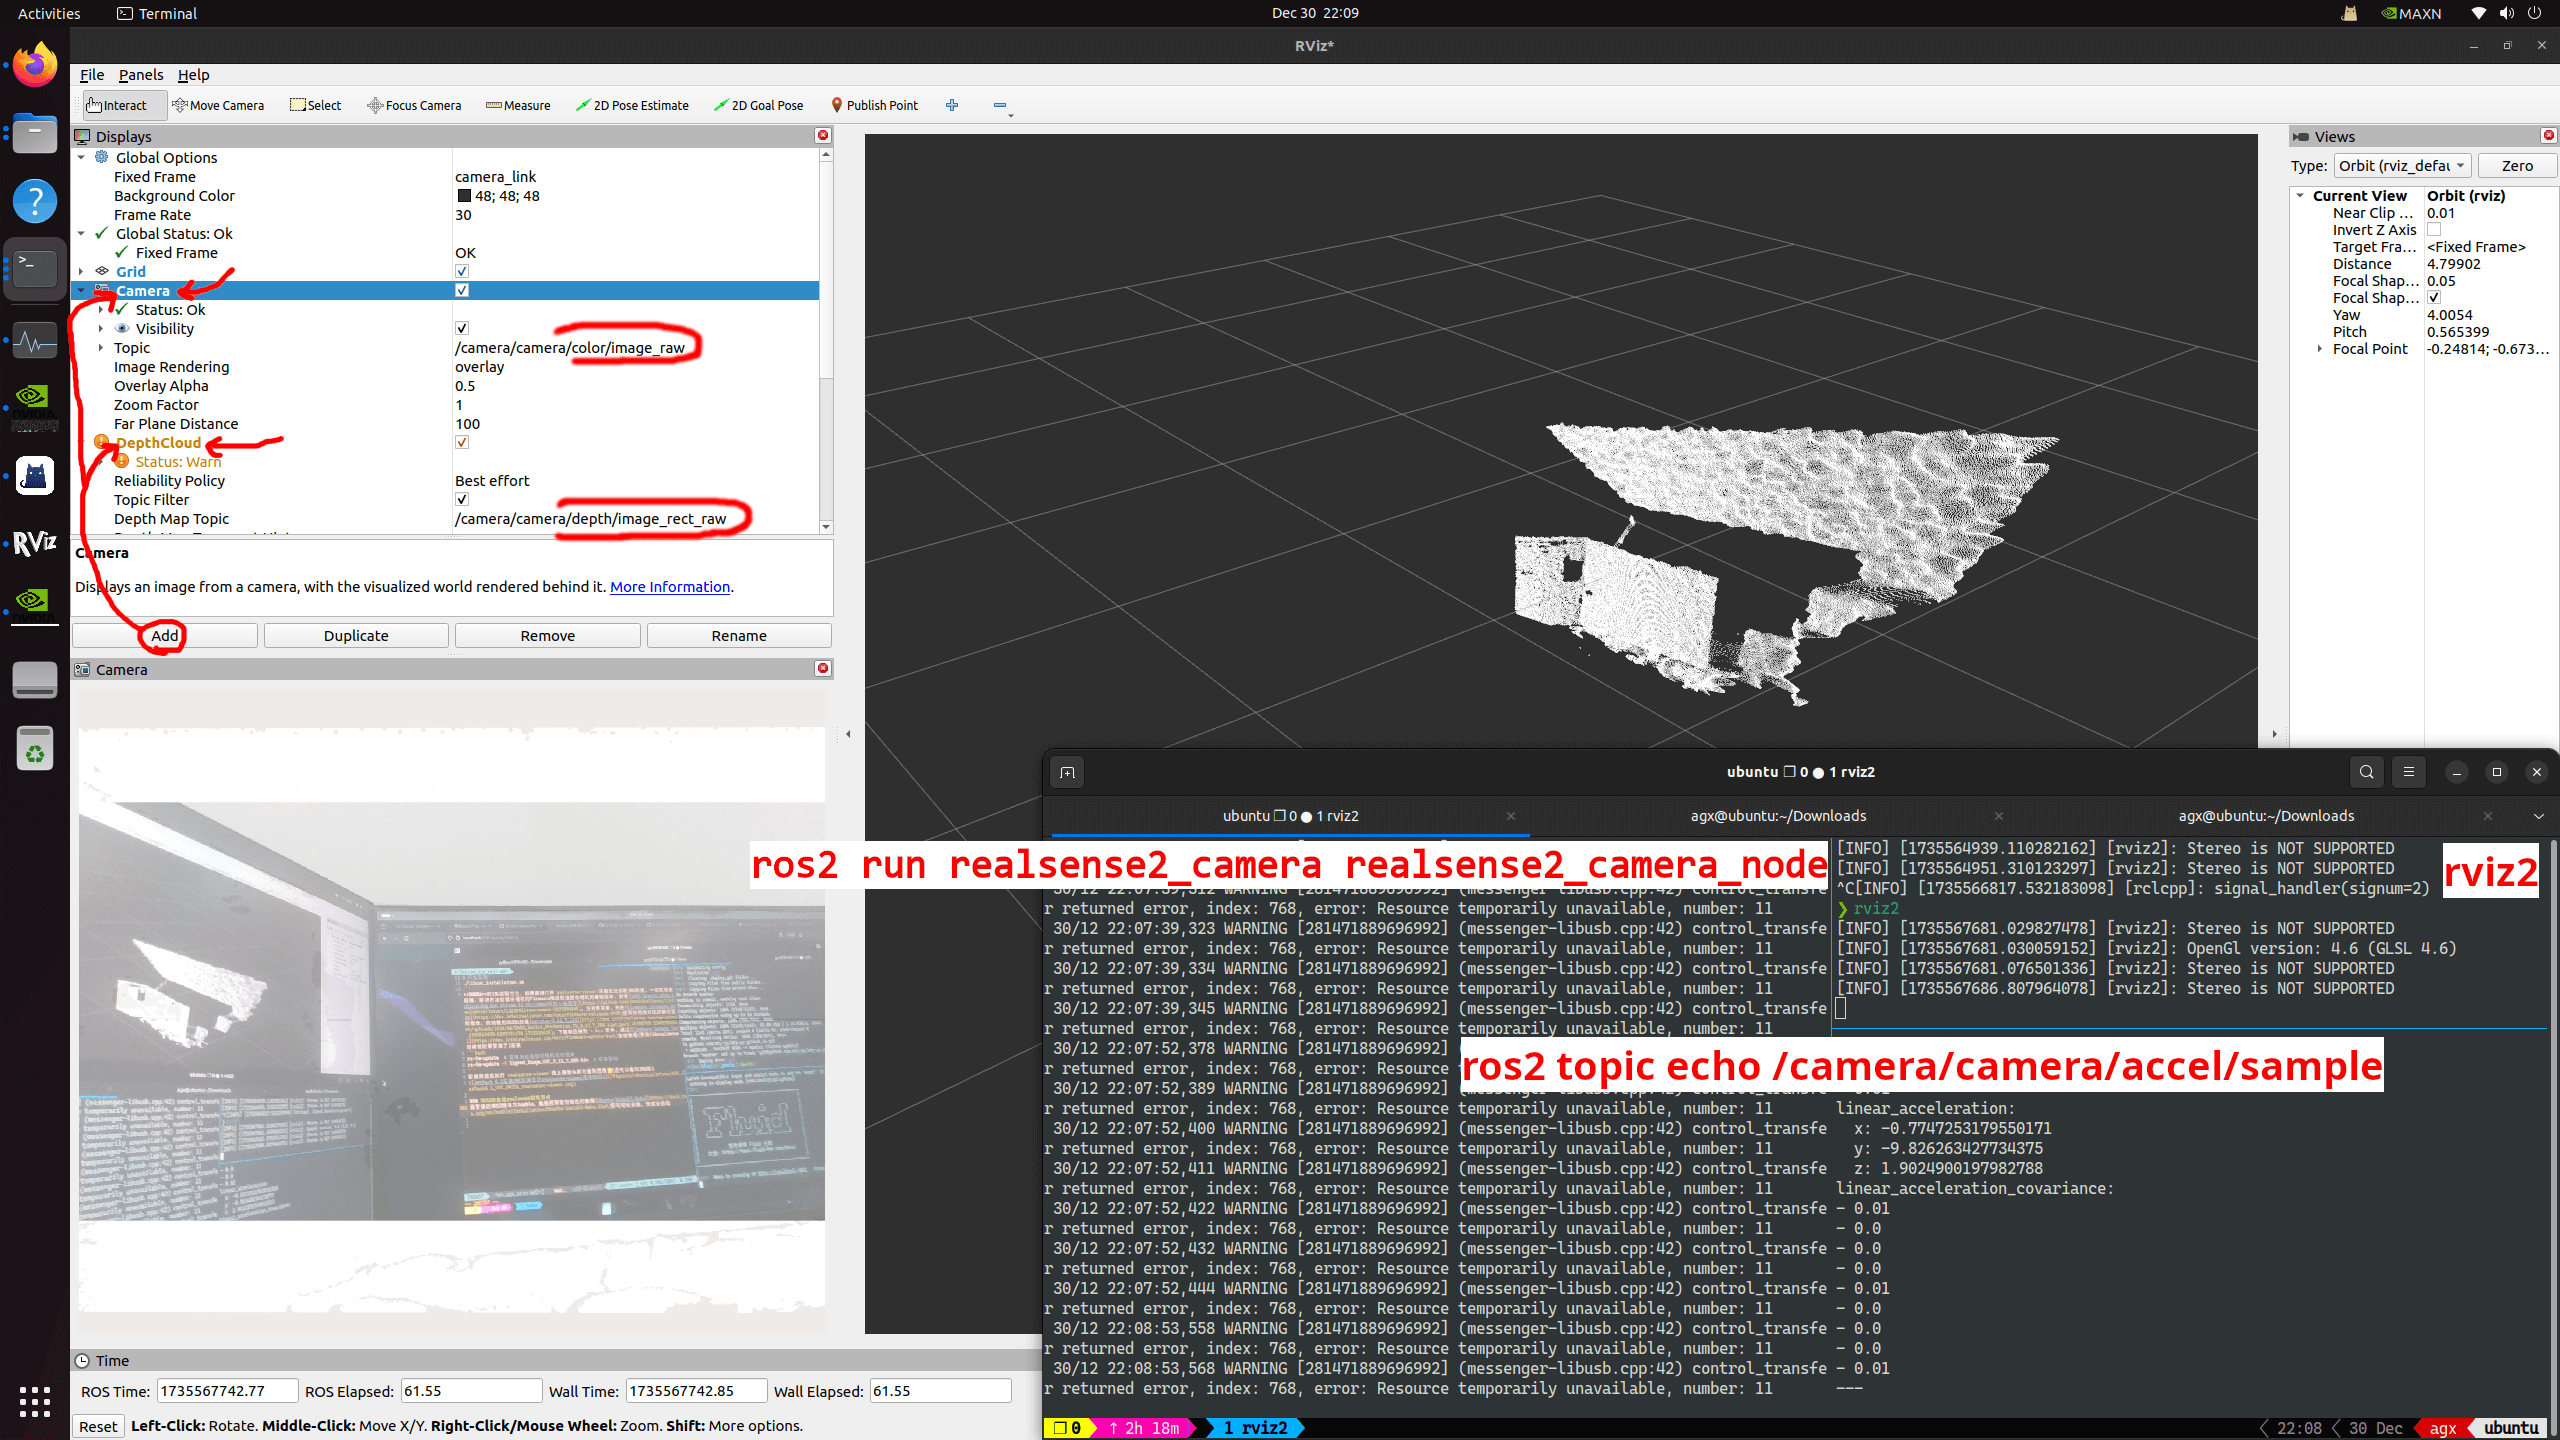
开三个终端分别启动如下指令
ros2 run realsense2_camera realsense2_camera_node  # 启动相机节点
rviz2  # 启动rviz2查看camera和DeepCloud
ros2 topic echo /camera/camera/accel/sample  # 查看IMU加速度信息节点
在rviz2中加入下图中左侧的窗口(点击Add按钮加入窗口),选择对应的topic节点,就可以看到效果啦🥳
使用YOLOv11识别ROS相机节点
在虚拟环境中安装PyTorch
参考Error with Pytorch and Torchvision中回复的消息,可以使用Python官方的virtualenv创建环境(这个虚拟环境类似Conda,但更轻量),好处在于安装的Pytorch所需的numpy等包不会和root下ROS相关的包冲突,并且由于是从root中Python生成的环境,因此可以使用root下的包(也就是ROS包)
注意环境创建后不能再随便移动位置,因为pip安装绑定了创建时的路径
sudo apt install virtualenv
# 进入到环境安装的路径, 例如 mkdir ~/envs && cd ~/envs
virtualenv torch_env  # 环境名torch_env
source torch_env/bin/activate  # 进入环境, 类似conda activate <env_name>
直接通过wheel安装已编译好的torch-2.5.0和torhcvision-0.20.0(安装torch-2.6.0可能和这个版本的torchvision不兼容,可以尝试安装下)
wget http://jetson.webredirect.org/jp6/cu126/+f/5cf/9ed17e35cb752/torch-2.5.0-cp310-cp310-linux_aarch64.whl#sha256=5cf9ed17e35cb7523812aeda9e7d6353c437048c5a6df1dc6617650333049092
pip install torch-2.5.0-cp310-cp310-linux_aarch64.whl
wget http://jetson.webredirect.org/jp6/cu126/+f/5f9/67f920de3953f/torchvision-0.20.0-cp310-cp310-linux_aarch64.whl#sha256=5f967f920de3953f2a39d95154b1feffd5ccc06b4589e51540dc070021a9adb9
pip install torchvision-0.20.0-cp310-cp310-linux_aarch64.whl其他jetpack版本可以在devpi - jetson-ai-lab中找到
安装完成后执行python -c "import torch; import torchvision; print(torch.__version__, torchvision.__version__); print(torch.cuda.is_available());"看看有没有抱错,输出
2.5.0 0.20.0
True
就说明安装成功了,由于我们还需要YOLOv11识别所以还需安装
pip install ultralytics编写相机节点launch文件
我们想控制读取到相机的分辨率,于是想手动写一个ROS2 package的launch文件来一键启动节点及我们的配置文件,还是在~/ros2_ws/src下继续创建:
cd ~/ros2_ws/src
ros2 pkg create my_rs_launch
cd my_rs_launch
mkdir config && cd config
vim rs_camera.yaml  # 贴入下文信息
cd ..
mkdir launch && cd launch
vim rs_launch.py # 贴入下文信息# 可选配置 D435i/D435
# 这个信息可以在启动相机节点后执行
# ros2 param describe /camera/camera rgb_camera.color_profile
# 获取到可选 宽x高xFPS 信息如下
# 1280x720x15
# 1280x720x30
# 1280x720x6
# 1920x1080x15
# 1920x1080x30
# 1920x1080x6
# 320x180x30
# 320x180x6
# 320x180x60
# 320x240x30
# 320x240x6
# 320x240x60
# 424x240x15
# 424x240x30
# 424x240x6
# 424x240x60
# 640x360x15
# 640x360x30
# 640x360x6
# 640x360x60
# 640x480x15
# 640x480x30
# 640x480x6
# 640x480x60
# 848x480x15
# 848x480x30
# 848x480x6
# 848x480x60
# 960x540x15
# 960x540x30
# 960x540x6
# 960x540x60
rgb_camera:
color_profile: '640x480x30'# Copyright 2023 Intel Corporation. All Rights Reserved.
#
# Licensed under the Apache License, Version 2.0 (the "License");
# you may not use this file except in compliance with the License.
# You may obtain a copy of the License at
#
# http://www.apache.org/licenses/LICENSE-2.0
#
# Unless required by applicable law or agreed to in writing, software
# distributed under the License is distributed on an "AS IS" BASIS,
# WITHOUT WARRANTIES OR CONDITIONS OF ANY KIND, either express or implied.
# See the License for the specific language governing permissions and
# limitations under the License.
"""Launch realsense2_camera node."""
import os
import yaml
from launch import LaunchDescription
import launch_ros.actions
from launch.actions import DeclareLaunchArgument, OpaqueFunction
from launch.substitutions import LaunchConfiguration
from ament_index_python.packages import get_package_share_directory
from pathlib import Path
configurable_parameters = [{'name': 'camera_name', 'default': 'camera', 'description': 'camera unique name'},
{'name': 'camera_namespace', 'default': 'camera', 'description': 'namespace for camera'},
{'name': 'serial_no', 'default': "''", 'description': 'choose device by serial number'},
{'name': 'usb_port_id', 'default': "''", 'description': 'choose device by usb port id'},
{'name': 'device_type', 'default': "''", 'description': 'choose device by type'},
# {'name': 'config_file', 'default': "''", 'description': 'yaml config file'},
{'name': 'config_file', 'default':
str(Path(get_package_share_directory('my_rs_launch'))/"config/rs_camera.yaml"), 'description': 'yaml config file'},
{'name': 'json_file_path', 'default': "''", 'description': 'allows advanced configuration'},
{'name': 'initial_reset', 'default': 'false', 'description': "''"},
{'name': 'accelerate_gpu_with_glsl', 'default': "false", 'description': 'enable GPU acceleration with GLSL'},
{'name': 'rosbag_filename', 'default': "''", 'description': 'A realsense bagfile to run from as a device'},
{'name': 'log_level', 'default': 'info', 'description': 'debug log level [DEBUG|INFO|WARN|ERROR|FATAL]'},
{'name': 'output', 'default': 'screen', 'description': 'pipe node output [screen|log]'},
{'name': 'enable_color', 'default': 'true', 'description': 'enable color stream'},
{'name': 'rgb_camera.color_profile', 'default': '0,0,0', 'description': 'color stream profile'},
{'name': 'rgb_camera.color_format', 'default': 'RGB8', 'description': 'color stream format'},
{'name': 'rgb_camera.enable_auto_exposure', 'default': 'true', 'description': 'enable/disable auto exposure for color image'},
{'name': 'enable_depth', 'default': 'true', 'description': 'enable depth stream'},
{'name': 'enable_infra', 'default': 'false', 'description': 'enable infra0 stream'},
{'name': 'enable_infra1', 'default': 'false', 'description': 'enable infra1 stream'},
{'name': 'enable_infra2', 'default': 'false', 'description': 'enable infra2 stream'},
{'name': 'depth_module.depth_profile', 'default': '0,0,0', 'description': 'depth stream profile'},
{'name': 'depth_module.depth_format', 'default': 'Z16', 'description': 'depth stream format'},
{'name': 'depth_module.infra_profile', 'default': '0,0,0', 'description': 'infra streams (0/1/2) profile'},
{'name': 'depth_module.infra_format', 'default': 'RGB8', 'description': 'infra0 stream format'},
{'name': 'depth_module.infra1_format', 'default': 'Y8', 'description': 'infra1 stream format'},
{'name': 'depth_module.infra2_format', 'default': 'Y8', 'description': 'infra2 stream format'},
{'name': 'depth_module.exposure', 'default': '8500', 'description': 'Depth module manual exposure value'},
{'name': 'depth_module.gain', 'default': '16', 'description': 'Depth module manual gain value'},
{'name': 'depth_module.hdr_enabled', 'default': 'false', 'description': 'Depth module hdr enablement flag. Used for hdr_merge filter'},
{'name': 'depth_module.enable_auto_exposure', 'default': 'true', 'description': 'enable/disable auto exposure for depth image'},
{'name': 'depth_module.exposure.1', 'default': '7500', 'description': 'Depth module first exposure value. Used for hdr_merge filter'},
{'name': 'depth_module.gain.1', 'default': '16', 'description': 'Depth module first gain value. Used for hdr_merge filter'},
{'name': 'depth_module.exposure.2', 'default': '1', 'description': 'Depth module second exposure value. Used for hdr_merge filter'},
{'name': 'depth_module.gain.2', 'default': '16', 'description': 'Depth module second gain value. Used for hdr_merge filter'},
{'name': 'enable_sync', 'default': 'false', 'description': "'enable sync mode'"},
{'name': 'enable_rgbd', 'default': 'false', 'description': "'enable rgbd topic'"},
{'name': 'enable_gyro', 'default': 'false', 'description': "'enable gyro stream'"},
{'name': 'enable_accel', 'default': 'false', 'description': "'enable accel stream'"},
{'name': 'gyro_fps', 'default': '0', 'description': "''"},
{'name': 'accel_fps', 'default': '0', 'description': "''"},
{'name': 'unite_imu_method', 'default': "0", 'description': '[0-None, 1-copy, 2-linear_interpolation]'},
{'name': 'clip_distance', 'default': '-2.', 'description': "''"},
{'name': 'angular_velocity_cov', 'default': '0.01', 'description': "''"},
{'name': 'linear_accel_cov', 'default': '0.01', 'description': "''"},
{'name': 'diagnostics_period', 'default': '0.0', 'description': 'Rate of publishing diagnostics. 0=Disabled'},
{'name': 'publish_tf', 'default': 'true', 'description': '[bool] enable/disable publishing static & dynamic TF'},
{'name': 'tf_publish_rate', 'default': '0.0', 'description': '[double] rate in Hz for publishing dynamic TF'},
{'name': 'pointcloud.enable', 'default': 'false', 'description': ''},
{'name': 'pointcloud.stream_filter', 'default': '2', 'description': 'texture stream for pointcloud'},
{'name': 'pointcloud.stream_index_filter','default': '0', 'description': 'texture stream index for pointcloud'},
{'name': 'pointcloud.ordered_pc', 'default': 'false', 'description': ''},
{'name': 'pointcloud.allow_no_texture_points', 'default': 'false', 'description': "''"},
{'name': 'align_depth.enable', 'default': 'false', 'description': 'enable align depth filter'},
{'name': 'colorizer.enable', 'default': 'false', 'description': 'enable colorizer filter'},
{'name': 'decimation_filter.enable', 'default': 'false', 'description': 'enable_decimation_filter'},
{'name': 'spatial_filter.enable', 'default': 'false', 'description': 'enable_spatial_filter'},
{'name': 'temporal_filter.enable', 'default': 'false', 'description': 'enable_temporal_filter'},
{'name': 'disparity_filter.enable', 'default': 'false', 'description': 'enable_disparity_filter'},
{'name': 'hole_filling_filter.enable', 'default': 'false', 'description': 'enable_hole_filling_filter'},
{'name': 'hdr_merge.enable', 'default': 'false', 'description': 'hdr_merge filter enablement flag'},
{'name': 'wait_for_device_timeout', 'default': '-1.', 'description': 'Timeout for waiting for device to connect (Seconds)'},
{'name': 'reconnect_timeout', 'default': '6.', 'description': 'Timeout(seconds) between consequtive reconnection attempts'},
]
def declare_configurable_parameters(parameters):
return [DeclareLaunchArgument(param['name'], default_value=param['default'], description=param['description']) for param in parameters]
def set_configurable_parameters(parameters):
return dict([(param['name'], LaunchConfiguration(param['name'])) for param in parameters])
def yaml_to_dict(path_to_yaml):
with open(path_to_yaml, "r") as f:
return yaml.load(f, Loader=yaml.SafeLoader)
def launch_setup(context, params, param_name_suffix=''):
_config_file = LaunchConfiguration('config_file' + param_name_suffix).perform(context)
params_from_file = {} if _config_file == "''" else yaml_to_dict(_config_file)
_output = LaunchConfiguration('output' + param_name_suffix)
if(os.getenv('ROS_DISTRO') == 'foxy'):
# Foxy doesn't support output as substitution object (LaunchConfiguration object)
# but supports it as string, so we fetch the string from this substitution object
# see related PR that was merged for humble, iron, rolling: https://github.com/ros2/launch/pull/577
_output = context.perform_substitution(_output)
return [
launch_ros.actions.Node(
package='realsense2_camera',
namespace=LaunchConfiguration('camera_namespace' + param_name_suffix),
name=LaunchConfiguration('camera_name' + param_name_suffix),
executable='realsense2_camera_node',
parameters=[params, params_from_file],
output=_output,
arguments=['--ros-args', '--log-level', LaunchConfiguration('log_level' + param_name_suffix)],
emulate_tty=True,
)
]
def generate_launch_description():
return LaunchDescription(declare_configurable_parameters(configurable_parameters) + [
OpaqueFunction(function=launch_setup, kwargs = {'params' : set_configurable_parameters(configurable_parameters)})
])这个文件就是在之前编译realsense2_camera包中提供的启动文件上修改了config_file的默认值(就是创建的config/rs_camera.yaml),源文件位置: ~/ros2_ws/install/realsense2_camera/share/realsense2_camera/launch,在rs_camera.yaml中选择你想要的分辨率大小即可,后续Python读入的就是这个分辨率
完成文件创建后,回到cd ~/ros2_ws,使用相对路径编译(如果报错rm -rf build log install删除之前缓存即可)
cd ~/ros2_ws
colcon build --symlink-install
source ~/ros2_ws/install/setup.sh
ros2 launch my_rs_launch rs_launch.py  # 启动节点
# 注意日志中的信息, Open profile: stream_type: Color(0), Format: RGB8, Width: 640, Height: 480, FPS: 30
# 应该就和rs_camera.yaml中配置的相同
YOLOv11识别
启动我们自定义的rs_launch.py文件后,随便找个地方创建如下代码并运行(需进入torch_env环境哦)
# deepseek-v3生成
import rclpy
from rclpy.node import Node
from sensor_msgs.msg import Image
from cv_bridge import CvBridge
import cv2
import time

class CameraSubscriber(Node):
  def __init__(self):
    super().__init__('camera_subscriber')
    # 订阅相机节点的图像话题(例如:/camera/image_raw)
    self.subscription = self.create_subscription(
      Image,
      '/camera/camera/color/image_raw',
      self.image_callback,
      10)
    self.subscription  # 防止未使用警告
    self.bridge = CvBridge()
    self.last_receive_time = time.time()
    self.avg_fps, self.count = 0, 0

  def image_callback(self, msg):
    try:
      # 将 ROS 2 图像消息转换为 OpenCV 格式
      cv_image = self.bridge.imgmsg_to_cv2(msg, 'bgr8')
      # 显示图像
      cv2.imshow("Camera Image", cv_image)
      cv2.waitKey(1)
      fps = 1/(time.time() - self.last_receive_time)
      self.count += 1
      self.avg_fps += (fps - self.avg_fps) / self.count
      print(f"img size={cv_image.shape}, FPS={fps:.5f}, AVG_FPS={self.avg_fps:.5f}")
      self.last_receive_time = time.time()
    except Exception as e:
      self.get_logger().error(f"Failed to convert image: {e}")

def main(args=None):
  rclpy.init(args=args)
  camera_subscriber = CameraSubscriber()
  rclpy.spin(camera_subscriber)
  camera_subscriber.destroy_node()
  rclpy.shutdown()
  cv2.destroyAllWindows()

if __name__ == '__main__':
  main()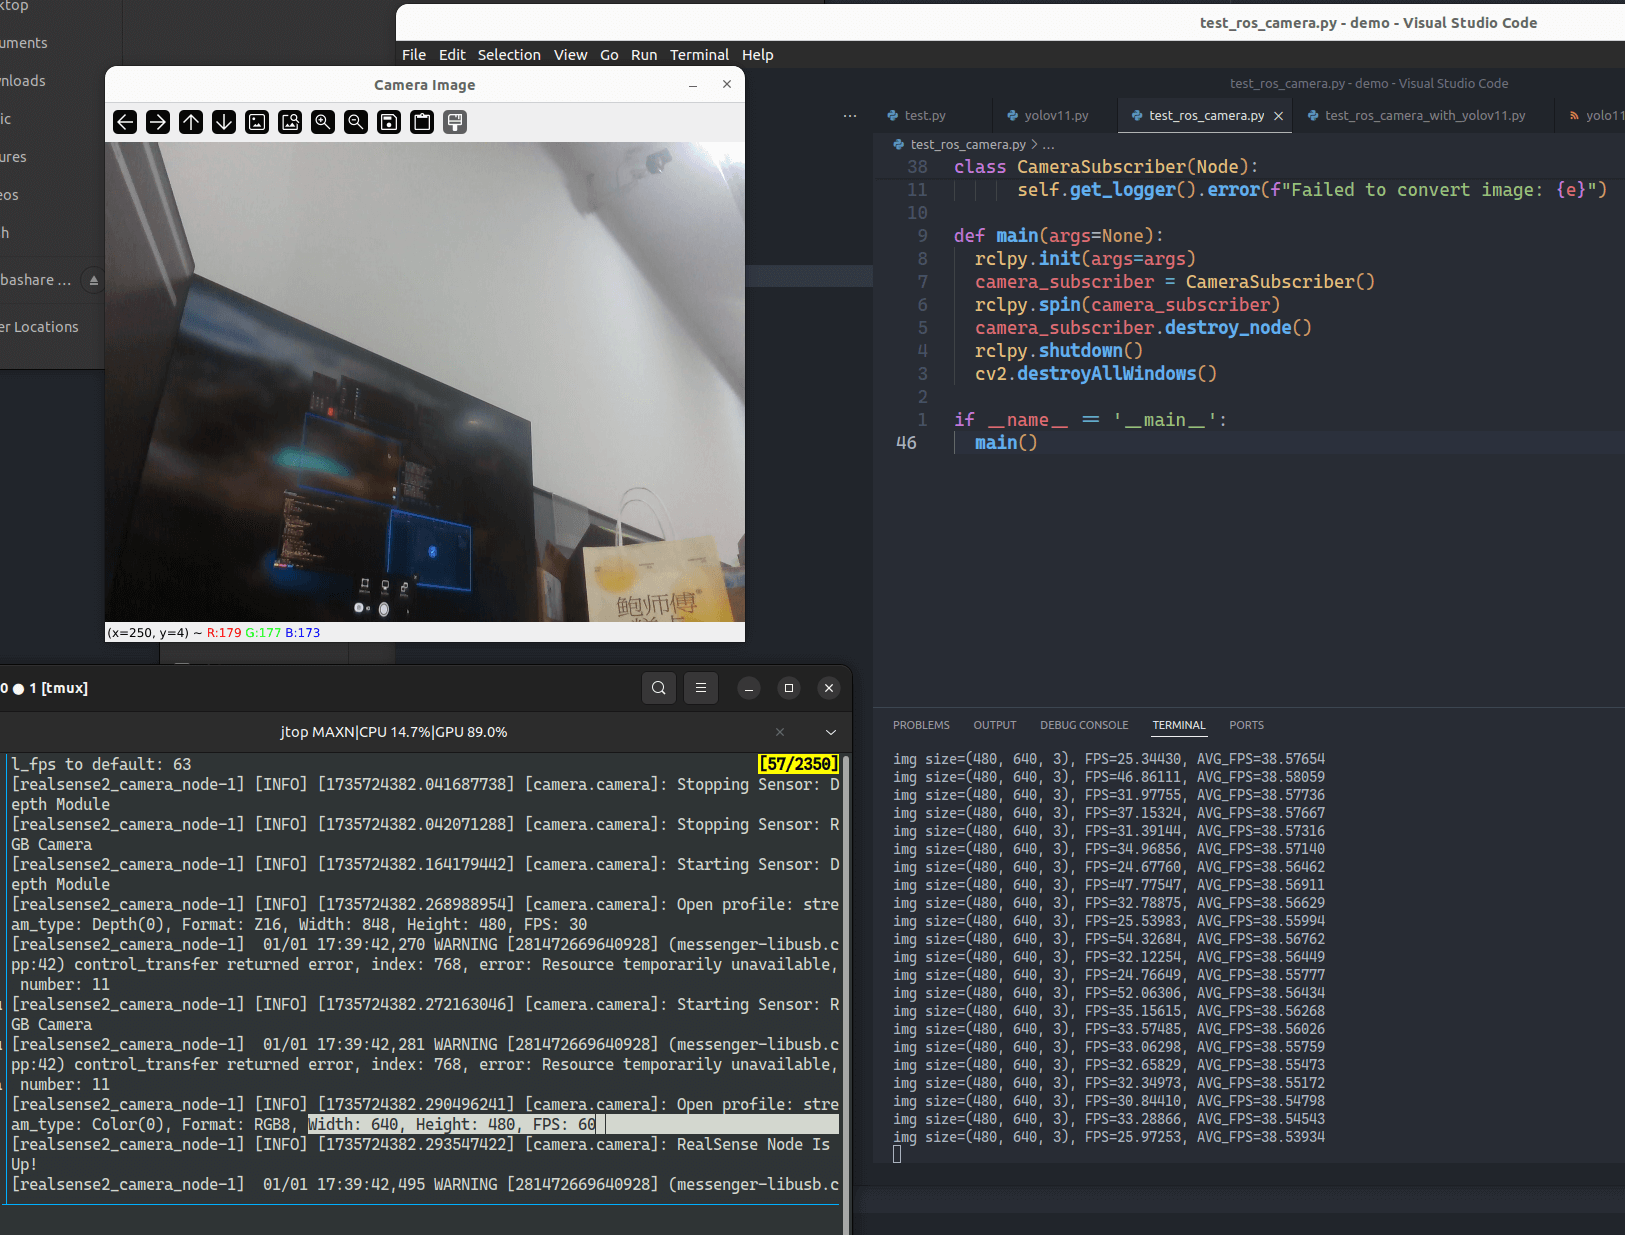
YOLOv11预测代码只需对上述代码小修即可(如果模型下载太慢,建议用浏览器挂VPN下下来,拷贝到当前工作路径下):
"""
DEBUG:
D435i: img size=(720, 1280, 3), FPS=31.05995, AVG_FPS=31.05758
D435: img size=(480, 640, 3), FPS=31.42766, AVG_FPS=31.22074

YOLOv11l: (total 32W)
D435i: 0: 480x640 1 tv, 1 book, 44.5ms
Speed: 1.3ms preprocess, 44.5ms inference, 2.5ms postprocess per image at shape (1, 3, 480, 640)
img size=(480, 640, 3), FPS=17.59961, AVG_FPS=18.12866

D435: 0: 480x640 1 person, 1 tv, 1 mouse, 2 keyboards, 57.7ms
Speed: 1.3ms preprocess, 57.7ms inference, 11.1ms postprocess per image at shape (1, 3, 480, 640)
img size=(480, 640, 3), FPS=11.24747, AVG_FPS=17.64535
YOLOv11l: 32W, 18FPS
YOLOv11m: 30W, 18FPS
YOLOv11n: 25W, 24FPS
"""
import rclpy
from rclpy.node import Node
from sensor_msgs.msg import Image
from cv_bridge import CvBridge
import cv2
import time
import torch
from ultralytics import YOLO
from ultralytics.engine.results import Results

class CameraSubscriber(Node):
  def __init__(self):
    super().__init__('camera_subscriber')
    # 订阅相机节点的图像话题(例如:/camera/image_raw)
    self.subscription = self.create_subscription(
      Image,
      '/camera/camera/color/image_raw',
      self.image_callback,
      10)
    self.subscription  # 防止未使用警告
    self.bridge = CvBridge()
    self.last_receive_time = time.time()
    self.avg_fps, self.count = 0, 0
    self.device = 'cuda' if torch.cuda.is_available() else 'cpu'
    print(f"Use device: {self.device}")
    self.model = YOLO("yolo11m.pt").to(self.device)

  def image_callback(self, msg):
    try:
      # 将 ROS 2 图像消息转换为 OpenCV 格式
      cv_image = self.bridge.imgmsg_to_cv2(msg, 'bgr8')
      # 显示图像
      result: Results = self.model.predict(cv_image)[0]
      cv2.imshow("Detect Camera Image", result.plot())
      cv2.waitKey(1)
      fps = 1/(time.time() - self.last_receive_time)
      self.count += 1
      self.avg_fps += (fps - self.avg_fps) / self.count
      print(f"img size={cv_image.shape}, FPS={fps:.5f}, AVG_FPS={self.avg_fps:.5f}")
      self.last_receive_time = time.time()
    except Exception as e:
      self.get_logger().error(f"Failed to convert image: {e}")

def main(args=None):
  rclpy.init(args=args)
  camera_subscriber = CameraSubscriber()
  rclpy.spin(camera_subscriber)
  camera_subscriber.destroy_node()
  rclpy.shutdown()
  cv2.destroyAllWindows()

if __name__ == '__main__':
main()| 模型 | 总功率 | 速度 |
|---|---|---|
| YOLOv11l | 32W | 18FPS |
| YOLOv11m | 30W | 18FPS |
| YOLOv11n | 25W | 24FPS |