小孔成像相机模型原理以及标定实现
最新更新于: 2025年5月11日晚上11点51分
我们使用深度相机 D435i 为例,使用 ROS1+RealSense+Kalibr 获取相机内参和畸变参数,再介绍两种获取外参的方法。
小孔成像相机模型
首先要搞懂三个坐标系的关系:
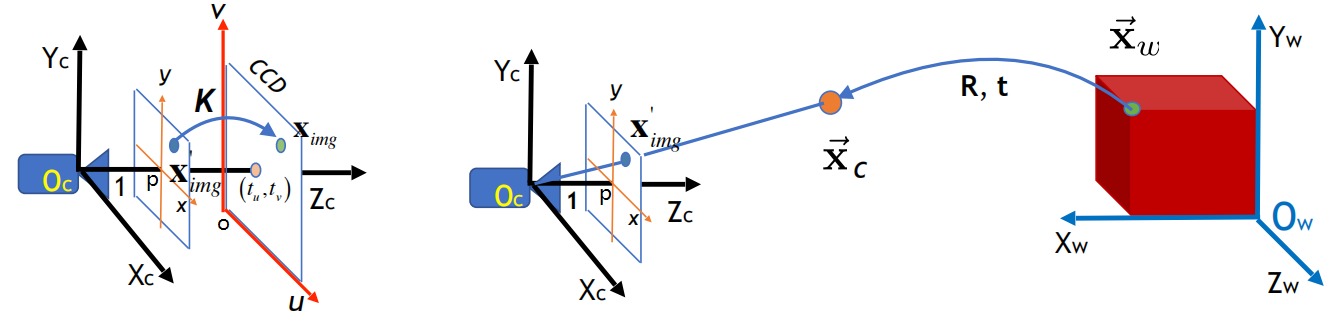
像素坐标系:是以成像平面中心为原点的 二维坐标系,单位为像素,坐标记为 。
相机坐标系:是以小孔成像点作为原点的 三维坐标系,单位为米,坐标记为 。
世界坐标系:可以空间中任意一点为原点的 三位坐标系,单位米,坐标记为 。
注意: 就是深度相机中的深度图中的深度大小,单位米。
在像素坐标系与相机坐标系的变换关系为
其中 为内参矩阵( 分别为两个方向上的 ), 为畸变矫正前的归一化相机坐标,通过径向-切向畸变矫正变换 :
其中 ,然后可以得到矫正后的相机坐标系
其中 为投影变换(逆变换就是 ),相机坐标系与世界坐标系的变换关系为
其中 为旋转矩阵(正交阵且行列式为 ), 为平移向量。综上,设世界坐标为 ,像素坐标为 ( 维度用 填充),则整个投影转换过程如下
其中 为内参矩阵, 表示消除畸变变换, 表示相机本身产生基本变换, 表示投影变换, 为旋转矩阵, 为世界坐标系原点在相机坐标系中的坐标, 为深度相机计算出的深度值。左式是针孔相机拍照时的过程,而右式则是深度相机图像中点反向计算世界坐标时的过程(CV 中常用)。
基于 Docker 安装 Ros1, RealSense SDK, Kalibr
我们需要使用 Kalibr 工具箱获取相机的畸变矩阵,安装 Kalibr 方法如下,参考官方教程,两种方法我都进行了尝试,首先尝试的就是直接编译安装,再是Docker安装。
但是最后发现系统自带的 Python 版本为 3.10,然而编译时候必须要用到一个叫 Boost 的工具包必须要 Python 3.8 版本,所以需要将其降级,最终但安装 ROS1 又会自动安装新版本,因此没有解决办法(失败过程如下):
-
安装 ROS1:参考BiliBili - Ubuntu 22.04 apt 安装 ros1 ros Noetic Ninjemys
-
安装 Python 相关包:我用
mamba(conda也一样)创建一个新的python 3.8.*的环境,使用pip安装这些依赖包:pip install catkin-tools osrf-pycommon scipy matplotlib wxpython pyx -
遇到报错
fatal error: libv4l2.h: No such file or directory:sudo apt install libv4l-devfatal error: pyconfig.h: No such file or directory,需要找到pyconfig.h文件位置,使用find /usr/include -name pyconfig.h产看返回结果,例如我返回的是/usr/include/python3.10/pyconfig.h说明该文件在/usr/include/python3.10/文件夹下,根据 overflow的解答 加入环境变量:export CPLUS_INCLUDE_PATH="$CPLUS_INCLUDE_PATH:/usr/include/python3.10/"fatal error: boost/detail/endian.hpp: No such file or directory:和上面的问题类似,只需要找到boost/detail/endian.hpp所在的路径,例如我的就在/usr/include/下,加入到 C++ 链接库中即可export CPLUS_INCLUDE_PATH="$CPLUS_INCLUDE_PATH:/usr/include/",注意:我的/detail目录下没有endian.hpp,所以我又做了个软链接映射过去:sudo ln -sf /usr/include/boost/endian.hpp /usr/include/boost/detail/endian.hppfatal error: stdlib.h: No such file or directory:和上面类似,找到stdlib.h,加入:CPLUS_INCLUDE_PATH="$CPLUS_INCLUDE_PATH:/usr/include/c++/11/"- 仍然使用
boost编译时始终爆出libboost_python310.so.1.74.0 (3.10, Boost_PYTHON_VERSION=3.8)的错误,后来又尝试下载boost手工编译python 3.8的版本,但仍然报错,最后只好放弃。
Docker安装Kalibr(成功):注意 Docker 安装的仅仅是 Kalibr,还是需要利用宿主机上安装的 ROS1 对相机数据进行获取。
-
安装 ROS1:参考BiliBili - Ubuntu 22.04 apt 安装 ros1 ros Noetic Ninjemys
-
安装 Docker:参考腾讯云 - 最详细的ubuntu安装docker教程,一定要记得配置用户组,不然每次使用时候前面都加个
sudo。(Docker 中常用命令可参考我的笔记 MyBlog - Docker 安装与常用命令) -
使用代理加速 Docker:由于2024年6月6日国内完全封杀 Docker 镜像源,因此我们只能通过代理方法连接 Docker Hub,参考 Myblog - Docker 代理加速(旧方法:更新 Docker 镜像站与 DNS 地址:参考CSDN - Docker拉取镜像过慢或卡死的坑!!!(亲测有效),源只需要一个即可,我用的是
https://ustc-edu-cn.mirror.aliyuncs.com,DNS 一定要检查下是否被修改过。)
我将我自己基于 Ubuntu 20.04 配好的 Kalibr 也上传到了 Docker Hub wtyyy/kalibr2004,可以直接
pull下来,从而直接使用步骤4中命令打开即可。
-
Docker-Kalibr 安装:参考官方教程 - Using the Docker Images,可视化CSDN - 如何可视化docker:以ROS环境为例(例如Gazebo,Rviz),
FOLDER=/home/wty/Programs/kalibr/data # 本地数据保存路径(**修改成你的哈**) xhost +local:root # 修改X11渲染主机权限为root,用于可视化ROS图像 docker run -it \ # 启动交互窗口 --privileged \ # 获取宿主机的管理员权限,从而可以获取外部设备信息 --net=host \ # 使用宿主机的网络,从而可以通过设置http_proxy和https_proxy直接使用代理 -e "DISPLAY" -e "QT_X11_NO_MITSHM=1" \ # 一些用于可视化的环境变量 -v "/dev:/dev" \ # 获取宿主机设备信息,从而可以读取到摄像头 -v "/tmp/.X11-unix:/tmp/.X11-unix:rw" \ # X11可视化转发 -v "$FOLDER:/data" \ # 将/data转发到本地的数据保存路径 kalibr # 启动的镜像名称 # 写成一行 docker run -it --privileged --net=host -e "DISPLAY" -e "QT_X11_NO_MITSHM=1" -v "/dev:/dev" -v "/tmp/.X11-unix:/tmp/.X11-unix:rw" -v "$FOLDER:/data" kalibr -
Docker 环境变量加载:
source devel/setup.bash可以将这句话加到
~/.bashrc中,注意我们修改了容器的内容后,需要对镜像使用docker commit kalibr kalibr:v1更新,例如这样就是更新镜像名称从kalibr -> kalibr:v1,下一次我们打开容器就从新的镜像kalibr:v1中打开即可,删除多余镜像方法参考 如何优雅地删除Docker镜像和容器(超详细),相机样例标定文件 下载链接。 -
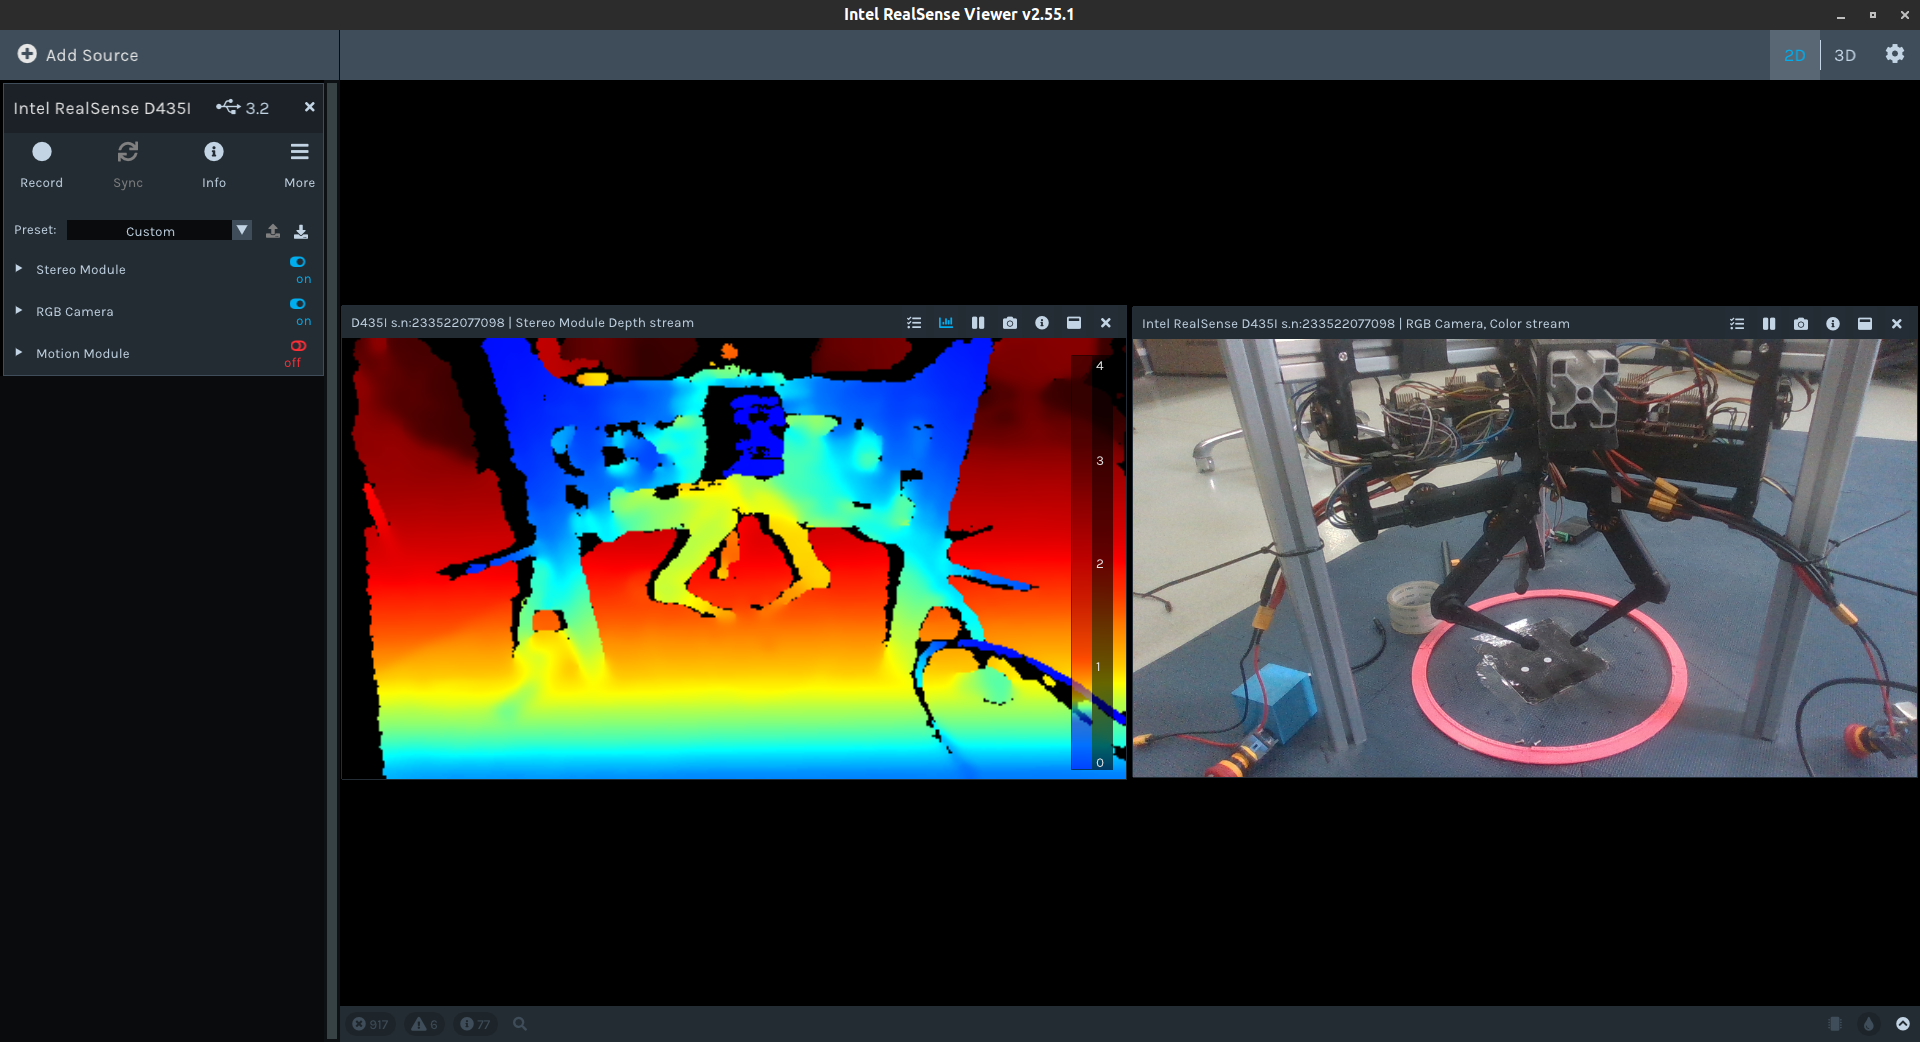
我们还需要安装 RealSense™ SDK 2.0,顺着官方教程 - Linux Distribution安装完成
librealsense2-dkms, librealsense2-utils,再连接摄像头,运行命令realsense-viewer看是否可以出现如下可视化界面,说明安装成功(记得把左边的摄像头功能开关打开):
内参标定(获取)
D435i 的内参矩阵 可以通过 RealSence SDK 直接获取(更加准确),但也可以通过下文中的畸变参数标定过程中获取。
在 ROS 中将摄像头加入话题(ROS 是一个控制系统,需要将每个设备手动打开,打开后成为一个 node,使用 rosnode list 查看,每个 node 还具有很多相关 topic,可以获取其参数信息,通过 rostopic list 查看全部 topic,使用 rostopic echo ${topic-name} 获取话题具体信息,而打开 D435 摄像头就需要使用 realsense 安装的相关依赖包), 内参获取方法如下:
相机分辨率需要先固定成和python获取到的一样,这里设置为 1280x720,修改 rs_camera.launch 中:
cd /opt/ros/noetic/share/realsense2_camera/launch/rs_camera.launch
# 找到26行中,infra_width, infra_height 分别将后面的数字修改为 1280x720
<arg name="infra_width"         default="1280"/>
<arg name="infra_height"        default="720"/>
# 找到33行中,color_width, color_height 分别将后面的数字修改为 1280x720
<arg name="color_width"         default="1280"/>
<arg name="color_height"        default="720"/>
执行 roslaunch realsense2_camera rs_camera.launch 将摄像头加入到 node,执行 rostopic list 查看(左图),并使用 rostopic echo /camera/color/camera_info (右图):
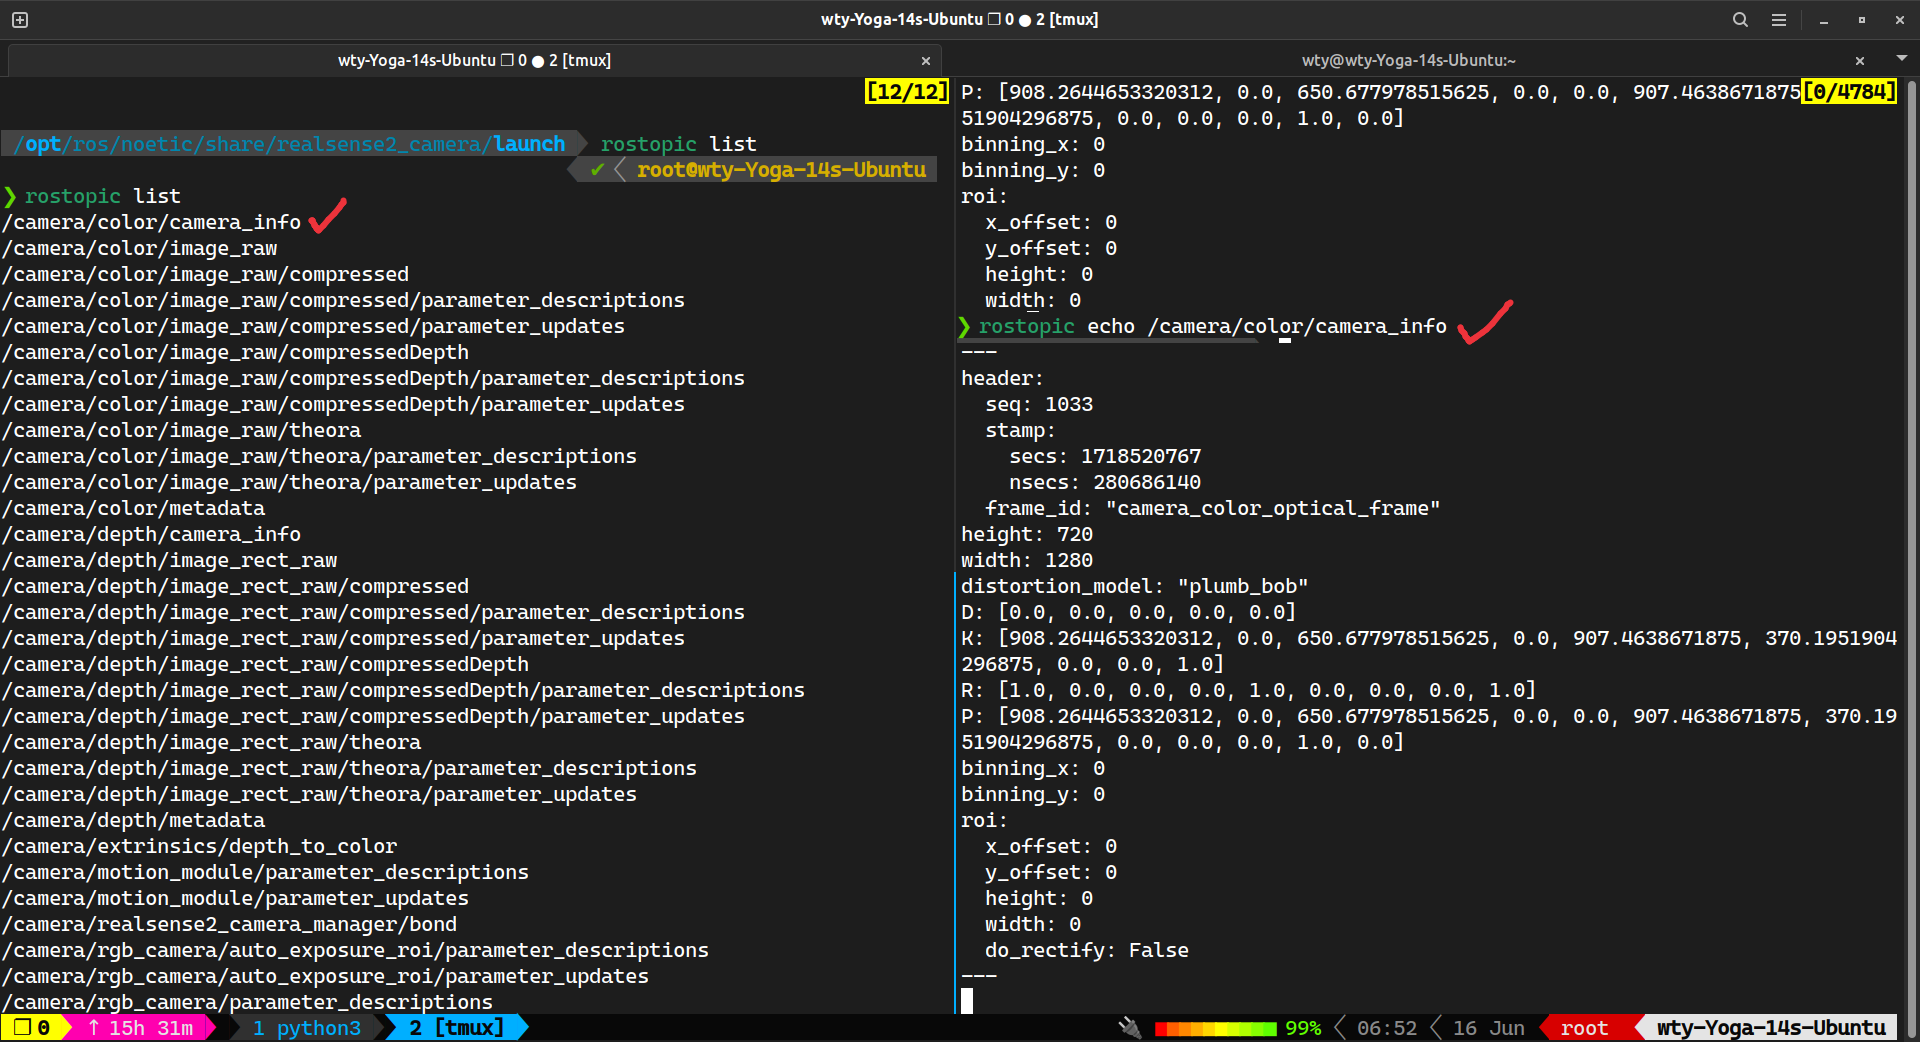
内参矩阵为 K: [908.2644653320312, 0.0, 650.677978515625, 0.0, 907.4638671875, 370.1951904296875, 0.0, 0.0, 1.0] 对应 矩阵的展开,非零项分别为内参矩阵中的 (和上文ROS2获取中的内参矩阵不同是因为换了个相机)
畸变系数标定
参考 Kalibr 官方教程 和 CSDN - Intel Realsense D435i标定详细步骤
显示当前摄像头
首先要学会通过 rviz 显示当前摄像头,首先我们还是打开相机节点 roslaunch realsense2_camera rs_camera.launch,打开一个新的终端(可以使用 tmux 或者用 vscode 打开 docker),执行 rviz,会弹出可视化界面,如下操作从 Add -> By topic -> /camera/color/image_raw/image -> OK 中,即可加入当前相机图像(要从边上拖出来才能放大)。
获取标定板
方法1(本机生成)
标定首先需要先打印出来一个标定板,标定版配置可以参考官方的配置文件,我们在共享路径创建配置文件如下:
❯ cat /data/april.yaml
target_type: 'aprilgrid'    # gridtype
tagCols: 6                  # number of apriltags
tagRows: 6                  # number of apriltags
tagSize: 0.088              # size of apriltag, edge to edge [m]
tagSpacing: 0.3             # ratio of space between tags to tagSize
对应生成标记板 pdf 文件命令为
kalibr_create_target_pdf --type apriltag --nx 6 --ny 6 --tsize 0.088 --tspace 0.3 /data/target.pdf我们就能在本机的共享目录 $FOLDER 下看到标定板target.pdf文件,从而进行打印。(但这个标定版大小很大,所以不支持A4打印,手动调整应该也行,但是很麻烦,推荐下面这个方法)
方法2(用网页自动生成,推荐,用A4纸就能打印)
在这个网站calib.io/Pattern Generator,进行如下设置:
Target Type: Kalibr/AprilGrid
Board Width [mm]: 297
Board Height [mm]: 210
Rows: 5
Columns: 6
Tag Size [mm]: 19就可以得到这个PDF文件啦,我们直接用A4纸打印出来就能用,对应的标定配置文件如下:
❯ cat /data/april.yaml
target_type: 'aprilgrid'    # gridtype
tagCols: 6                  # number of apriltags
tagRows: 5                  # number of apriltags
tagSize: 0.019              # size of apriltag, edge to edge [m]
tagSpacing: 0.3             # ratio of space between tags to tagSize
录制ROS视频包
标定是离线进行的,所以我们需要先录制一个视频包下来,但是我们不用在相机原有的频率下标记,所以创建一个固定 10Hz 频率(随便给个低点的就行)的新节点 \color:rosrun topic_tools throttle messages /camera/color/image_raw 10.0 /color,然后我们再从上面的 rviz 中打开 /color 节点的图像,可以看到有明显掉帧,我们拿起标定板保持在摄像头中,开始视频录制 rosbag record -O /data/camd435i_10hz /color,在录制过程中可以左右移动下标记板,然后 ctrl C 停止录制,文件保存在 /data/camd435i_10hz.bag 中。
內参矩阵及畸变系数计算
如果 kalibr_calibrate_cameras 无法执行,添加路径:export PATH=/catkin_ws/devel/lib/kalibr:$PATH 。
执行下述代码(可视化角点检测效果 Kalibr标记效果.webm)
kalibr_calibrate_cameras --target /data/april.yaml \  # 标记板配置文件
	--bag /data/camd435i_10hz.bag \  # 录制的视频包
	--models pinhole-radtan \  # 选择的相机模型为pinhole,畸变模型为radtan
	--topics /color \  # 选择录制视频的话题
	--show-extractio  # 可视化角点检测结果
# 写成一行
kalibr_calibrate_cameras --target /data/april.yaml --bag /data/camd435i_10hz.bag --models pinhole-radtan --topics /color --show-extractio
等执行完成后,在 /data 文件夹(共享文件夹)下会生成三个文件 *.pdf, *.txt, *.yaml
Calibration results
====================
Camera-system parameters:
cam0 (/color):
    type: <class 'aslam_cv.libaslam_cv_python.DistortedPinholeCameraGeometry'>
    distortion: [ 0.1136323  -0.24918569 -0.00006587  0.00135696] +- [0.00317183 0.00929075 0.00046802 0.00045858]
    projection: [900.87667006 900.02687406 652.03098026 367.2331528 ] +- [0.92552758 0.81790359 1.04089438 1.11924883]
    reprojection error: [0.000000, 0.000000] +- [0.268245, 0.238228]


Target configuration
====================

  Type: aprilgrid
  Tags:
    Rows: 6
    Cols: 6
    Size: 0.088 [m]
    Spacing 0.026399999999999996 [m]
消除畸变变换如下:
可以看出畸变系数为 [ 0.1136323 -0.24918569 -0.00006587 0.00135696],其中前两个为径向畸变 ,后两个为切向畸变 。对于内参矩阵,和 ROS+RealSense 直接读取出来的比较接近,但没有那个精确,我们还是使用直接读取出来的用于后续计算。
外参标定
使用内参和畸变矩阵可以得到从像素坐标系到相机坐标系的变换,再找到旋转+平移(仿射变换)矩阵就可以从相机坐标系到世界坐标系,我们关注 小孔成像相机模型 中的相机与世界坐标系 式,图像与世界坐标系 式:
两式分别对应计算 有两种方法:
-
通过 式直接计算:我们可以通过获取世界坐标系中的 三个点在图像中的位置(图像识别),通过内参矩阵 以及深度信息 得到对应的相机坐标 ,将三个点对分别带入 式中,从而计算出 中的 和 ,通过外积求得 。但是这种方法由于 的估计可能存在误差,不能保证 即 是旋转矩阵。(代码
get_extri.py中的calPoseFrom3Points) -
通过 式直接计算:另一种不依赖深度信息的方法是使用最小二乘法,通过
cv2中求解solvePnP的方法来获取(官方外参标定文档 Perspective-n-Point (PnP) pose computation),假设我们给出 个世界坐标系与相机坐标系的点对 ,通过求解最优化问题,得到 。
模拟小孔相机模型
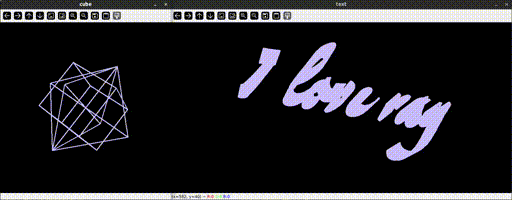
即使没有摄像机,我们也可以通过 Python 中的 Numpy 和 cv2,将自己创建的三维空间中点通过小孔相机模型投影到二维平面上,并进行可视化,从而模拟成像过程,用上述两种方法反算出相机的外参,效果如下所示
定义空间物体
class SpaceObject:
  x_world: np.ndarray
  lines: np.ndarray

class Cube(SpaceObject):
  def __init__(self, width=1, center=np.array([0,0,0])):
    self.width = width
    self.center = center
    self.x_world = (np.array([
      [0, 0, 0], [1, 0, 0], [0, 1, 0], [0, 0, 1],
      [1, 1, 0], [1, 0, 1], [0, 1, 1], [1, 1, 1],
    ], np.float32) - np.array([0.5]*3, np.float32)) * width + np.ones(3, np.float32) * center
    self.lines = np.array([
      [0, 1], [0, 2], [1, 4], [2, 4],
      [0, 3], [1, 5], [2, 6], [4, 7],
      [5, 7], [6, 7], [3, 6], [3, 5],
    ], np.int32)

class Triangle(SpaceObject):
  def __init__(self, pos=None):
    if pos is None:
      pos = [(1,0,0), (0,1,0), (0,0,0)]
    self.x_world = np.array(pos, np.float32)  # (3, 3)
    self.lines = np.array([[0, 1], [1, 2], [2, 0]], np.int32)
定义相机
def rotation_3d(rot: Sequence):
  rx, ry, rz = rot
  sin, cos = np.sin, np.cos
  Rx = np.array([[1,0,0],[0,cos(rx),-sin(rx)],[0,sin(rx),cos(rx)]], np.float32)
  Ry = np.array([[cos(ry),0,sin(ry)],[0,1,0],[-sin(ry),0,cos(ry)]], np.float32)
  Rz = np.array([[cos(rz),-sin(rz),0],[sin(rz),cos(rz),0],[0,0,1]], np.float32)
  return Rx @ Ry @ Rz

class Camera:
  def __init__(self, fx=800, fy=800, u0=256, v0=256, rot=[np.pi/4,np.pi/6,np.pi/4], tran=[0,0,5], name='camera'):
    self.name = name
    self.fx, self.fy, self.u0, self.v0 = fx, fy, u0, v0
    self.img_size = (self.u0 * 2, self.v0 * 2)
    self.K = np.array([
      [fx, 0, u0],
      [0, fy, v0],
      [0, 0, 1]
    ], np.float32)
    self.rot = np.array(rot, np.float32)
    self.R = rotation_3d(rot)
    self.T = np.array(tran, dtype=np.float32)
    self.x_camera, self.x_img = [], []

  def cap(self, obj: SpaceObject, draw_vertex=True, show=True, delay=10, img=None):
    x_world = obj.x_world  # (N, 3)
    x_camera = x_world @ self.R.T + self.T.T
    self.x_camera.append(x_camera)
    x_img = x_camera @ self.K.T / x_camera[:, -1:]
    x_img = x_img[:, :2].astype(np.int32)
    self.x_img.append(x_img)
    if img is None:
      img = np.zeros((*self.img_size, 3), np.uint8)
    for (i, j) in obj.lines:
      cv2.line(img, x_img[i], x_img[j], color=(255,192,203), thickness=2)
    if draw_vertex:
      for pos in x_img:
        cv2.circle(img, pos, radius=1, color=(255,0,0), thickness=4)
    if show: self.show(img, delay)
    return img

  def cap_multi(self, objs: Sequence[SpaceObject], delay=10):
    img = None
    self.x_img = []
    for obj in objs:
      img = self.cap(obj, draw_vertex=False, show=False, img=img)
    self.x_img = np.concatenate(self.x_img, 0)
    self.show(img, delay)
    return img

  def show(self, img, delay):
    cv2.imshow(self.name, img)
    cv2.waitKey(delay)
外参标定
def get_extrinsics_img_and_world(x_img: np.ndarray, x_world: np.ndarray, K: np.ndarray, dist=None):
  """
  Give one-to-one N points in two coordinate systems, return world coor-sys to camera coor-sys.
  Args:
    x_img [shape=(N,3)]: Points in image coordinate system
    x_world [shape=(N,3)]: Points in world coordinate system
    K [shape=(3,3)]: Camera internal matrix
    dist [shape=(4,) or None]: If not None, give distortion coefficients k1, k2, p1, p2 (option: [k3, k4] after)
  """
  assert len(x_img) == len(x_world)
  _, R, T = cv2.solvePnP(
    x_world.astype(np.float32), x_img.astype(np.float32), K.astype(np.float32), distCoeffs=dist,
    flags=cv2.SOLVEPNP_P3P
  )
  R, _ = cv2.Rodrigues(R)
  return R, T

def get_extrinsics_camera_and_world(o: np.ndarray, x: np.ndarray, y: np.ndarray):
  """
  Args:
    o [shape=(3,)]: World (0, 0, 0) in camera coordinate system
    x [shape=(3,)]: World (x, 0, 0) in camera coordinate system, x can be any real number
    y [shape=(3,)]: World (0, y, 0) in camera coordinate system, y can be any real number
  Returns:
    R: Rotation matrix
    T: Translation vector
  """
  T = o
  r1, r2 = (x - T) / np.linalg.norm(x - T), (y - T) / np.linalg.norm(y - T)
  r3 = np.cross(r1, r2)
  r3 /= np.linalg.norm(r3)
  return np.array([r1,r2,r3], np.float32).T, T.T
完整代码
import numpy as np
import cv2
from typing import Sequence

class SpaceObject:
  x_world: np.ndarray
  lines: np.ndarray

class Cube(SpaceObject):
  def __init__(self, width=1, center=np.array([0,0,0])):
    self.width = width
    self.center = center
    self.x_world = (np.array([
      [0, 0, 0], [1, 0, 0], [0, 1, 0], [0, 0, 1],
      [1, 1, 0], [1, 0, 1], [0, 1, 1], [1, 1, 1],
    ], np.float32) - np.array([0.5]*3, np.float32)) * width + np.ones(3, np.float32) * center
    self.lines = np.array([
      [0, 1], [0, 2], [1, 4], [2, 4],
      [0, 3], [1, 5], [2, 6], [4, 7],
      [5, 7], [6, 7], [3, 6], [3, 5],
    ], np.int32)

class Triangle(SpaceObject):
  def __init__(self, pos=None):
    if pos is None:
      pos = [(1,0,0), (0,1,0), (0,0,0)]
    self.x_world = np.array(pos, np.float32)  # (3, 3)
    self.lines = np.array([[0, 1], [1, 2], [2, 0]], np.int32)

def rotation_3d(rot: Sequence):
  rx, ry, rz = rot
  sin, cos = np.sin, np.cos
  Rx = np.array([[1,0,0],[0,cos(rx),-sin(rx)],[0,sin(rx),cos(rx)]], np.float32)
  Ry = np.array([[cos(ry),0,sin(ry)],[0,1,0],[-sin(ry),0,cos(ry)]], np.float32)
  Rz = np.array([[cos(rz),-sin(rz),0],[sin(rz),cos(rz),0],[0,0,1]], np.float32)
  return Rx @ Ry @ Rz

class Camera:
  def __init__(self, fx=800, fy=800, u0=256, v0=256, rot=[np.pi/4,np.pi/6,np.pi/4], tran=[0,0,5], name='camera'):
    self.name = name
    self.fx, self.fy, self.u0, self.v0 = fx, fy, u0, v0
    self.img_size = (self.u0 * 2, self.v0 * 2)
    self.K = np.array([
      [fx, 0, u0],
      [0, fy, v0],
      [0, 0, 1]
    ], np.float32)
    self.rot = np.array(rot, np.float32)
    self.R = rotation_3d(rot)
    self.T = np.array(tran, dtype=np.float32)
    self.x_camera, self.x_img = [], []

  def cap(self, obj: SpaceObject, draw_vertex=True, show=True, delay=10, img=None):
    x_world = obj.x_world  # (N, 3)
    x_camera = x_world @ self.R.T + self.T.T
    self.x_camera.append(x_camera)
    x_img = x_camera @ self.K.T / x_camera[:, -1:]
    x_img = x_img[:, :2].astype(np.int32)
    self.x_img.append(x_img)
    if img is None:
      img = np.zeros((*self.img_size, 3), np.uint8)
    for (i, j) in obj.lines:
      cv2.line(img, x_img[i], x_img[j], color=(255,192,203), thickness=2)
    if draw_vertex:
      for pos in x_img:
        cv2.circle(img, pos, radius=1, color=(255,0,0), thickness=4)
    if show: self.show(img, delay)
    return img

  def cap_multi(self, objs: Sequence[SpaceObject], delay=10):
    img = None
    self.x_img = []
    for obj in objs:
      img = self.cap(obj, draw_vertex=False, show=False, img=img)
    self.x_img = np.concatenate(self.x_img, 0)
    self.show(img, delay)
    return img

  def show(self, img, delay):
    cv2.imshow(self.name, img)
    cv2.waitKey(delay)

def get_extrinsics_img_and_world(x_img: np.ndarray, x_world: np.ndarray, K: np.ndarray, dist=None):
  """
  Give one-to-one N points in two coordinate systems, return world coor-sys to camera coor-sys.
  Args:
    x_img [shape=(N,3)]: Points in image coordinate system
    x_world [shape=(N,3)]: Points in world coordinate system
    K [shape=(3,3)]: Camera internal matrix
    dist [shape=(4,) or None]: If not None, give distortion coefficients k1, k2, p1, p2 (option: [k3, k4] after)
  """
  assert len(x_img) == len(x_world)
  _, R, T = cv2.solvePnP(
    x_world.astype(np.float32), x_img.astype(np.float32), K.astype(np.float32), distCoeffs=dist,
    flags=cv2.SOLVEPNP_P3P
  )
  R, _ = cv2.Rodrigues(R)
  return R, T

def get_extrinsics_camera_and_world(o: np.ndarray, x: np.ndarray, y: np.ndarray):
  """
  Args:
    o [shape=(3,)]: World (0, 0, 0) in camera coordinate system
    x [shape=(3,)]: World (x, 0, 0) in camera coordinate system, x can be any real number
    y [shape=(3,)]: World (0, y, 0) in camera coordinate system, y can be any real number
  Returns:
    R: Rotation matrix
    T: Translation vector
  """
  T = o
  r1, r2 = (x - T) / np.linalg.norm(x - T), (y - T) / np.linalg.norm(y - T)
  r3 = np.cross(r1, r2)
  r3 /= np.linalg.norm(r3)
  return np.array([r1,r2,r3], np.float32).T, T.T

def random_rotation(camera: Camera, objs, n_sample=100, rand_range=2*np.pi, rand_time=np.inf):
  camera.cap_multi(objs)

  rot = base_rot = camera.rot
  i = 0
  while i < rand_time:
    i += 1
    # target = [rand[0], np.pi, np.pi]
    delta = (np.random.rand(3) - 0.5) * rand_range / 2
    target = base_rot + delta
    rs = np.linspace(rot, target, n_sample)
    for r in rs:
      camera.R = rotation_3d(r)
      camera.cap_multi(objs)
    rot = target
    # print(r.shape)

def demo1_play_with_graphics():
  camera = Camera(name='cube')
  objs = [Cube(),
    Triangle([(0,0,0),(1,0,0),(0,0,1)]), Triangle([(0,0,0),(-1,0,0),(0,0,1)]),
    Triangle([(0,0,0),(1,0,0),(0,0,-1)]), Triangle([(0,0,0),(-1,0,0),(0,0,-1)]),
    Triangle([(0,0,0),(0,1,0),(0,0,1)]), Triangle([(0,0,0),(0,1,0),(0,0,-1)]),
    Triangle([(0,0,0),(0,-1,0),(0,0,1)]), Triangle([(0,0,0),(0,-1,0),(0,0,-1)]),
  ]
  random_rotation(camera, objs)

def demo2_play_with_text():
  from stl import mesh
  camera = Camera(v0=512, rot=[0,np.pi,np.pi], tran=[10,-10,30], name='text')
  ms = mesh.Mesh.from_file('test1.stl')
  objs = [Triangle(tri) for tri in ms.vectors]
  random_rotation(camera, objs, n_sample=10, rand_range=np.pi/2)

def demo3_get_extrinsics_img_and_world():
  camera = Camera(name='cube')
  obj = Cube()
  camera.cap(obj, show=False)
  R, T = get_extrinsics_img_and_world(camera.x_img[0][:4], obj.x_world[:4], camera.K)
  print("(DEMO3) Calculate extrinsics by image and world points relation:")
  print("real:", camera.R, camera.T)
  print("calc:", R, T); print()

def demo4_get_extrinsics_camera_and_world():
  camera = Camera(name='cube')
  x_world = np.array([[0,0,0], [3,0,0], [0,-10,0]], np.float32)
  x_camera = x_world @ camera.R.T + camera.T.T
  R, T = get_extrinsics_camera_and_world(x_camera[0], x_camera[1], x_camera[2])
  print("(DEMO4) Calculate extrinsics by world points in camera coordinate system:")
  print("real:", camera.R, camera.T)
  print("calc:", R, T); print()

if __name__ == '__main__':
  demo3_get_extrinsics_img_and_world()
  demo4_get_extrinsics_camera_and_world()
  import multiprocessing
  multiprocessing.Process(target=demo1_play_with_graphics).start()
  # demo2_play_with_text()  # add test1.stl in current folder, generate by https://www.enjoying3d.com/tool/text.php
demo3, demo4 的外参计算结果如下,看得出来通过相机坐标直接计算,在深度信息准确时,结果也是非常精准的
(DEMO3) Calculate extrinsics by image and world points relation:
real: [[ 0.6123724  -0.6123724   0.5       ]
 [ 0.74999994  0.24999999 -0.6123724 ]
 [ 0.24999999  0.74999994  0.6123724 ]] [0. 0. 5.]
calc: [[ 0.61252489 -0.61320246  0.49879455]
 [ 0.74928849  0.24945152 -0.61346613]
 [ 0.25175388  0.74950429  0.61226082]] [[-2.44022356e-03]
 [-1.22664996e-03]
 [ 4.99840478e+00]]

(DEMO4) Calculate extrinsics by world points in camera coordinate system:
real: [[ 0.6123724  -0.6123724   0.5       ]
 [ 0.74999994  0.24999999 -0.6123724 ]
 [ 0.24999999  0.74999994  0.6123724 ]] [0. 0. 5.]
calc: [[ 0.61237246  0.61237246 -0.5       ]
 [ 0.75       -0.25        0.6123725 ]
 [ 0.25000003 -0.75       -0.61237246]] [0. 0. 5.]
想要可视化文字建模,需要从 立体文字-Enjoying3D打印云平台 上下载空间建模文件 *.stl,重命名为 test1.stl 放到同级目录下即可。
(可跳过)ROS2 + RealSense获取内参矩阵
[教程]安装realsense-ros,realsense-SDK 是用于相机可视化与获取相机内参,需要依赖 ROS 与相机进行通讯,我们根据上述教程进行安装:
- ROS2 安装:我们安装的是 ROS2 Humble(这个相比 ROS2 Iron 有更长的维护时间)
- 安装:直接进入官方的安装教程中,顺次执行下来即可,注意安装
sudo apt install ros-humble-desktop时候可能会爆版本过高的问题,我们可以先安装sudo apt install aptitude用于包版本降级,再使用sudo aptitude install ros-humble-desktop进行安装(如此安装需要要对安装策略进行选择,当看到ros-humble-desktop在uninstall列表中时,按n回车,让其继续给出新的安装策略,直到ros-humble-desktop不再uninstall中时,按y回车) - 环境变量:安装完成
ros-humble-desktop后还需要执行source /opt/ros/humble/setup.bash对环境变量进行更新,由于我用的是zsh,所以执行source /opt/ros/humble/setup.zsh即可。如果不想每次都source一次可以直接将source source /opt/ros/humble/setup.zsh加入到~/.zshrc中(如果是 bash 则加入到.bashrc中) - 简单测试:在一个终端中打开一个小乌龟测试器
ros2 run turtlesim turtlesim_node,再开一个终端打开ros2 run turtlesim turtle_teleop_key控制器(节点),对里面按上下左右即可对小乌龟进行控制了!
- 安装:直接进入官方的安装教程中,顺次执行下来即可,注意安装
- 安装 RealSense™ SDK 2.0:安装教程,只需安装
librealsense2-dkms和librealsense2-utils即可,输入命令realsense-viewer即可打开相机显示的可视化界面(连接相机即可看到画面,包含图像及深度图) - 向 ROS2 中安装 RealSense wrapper:我的是
humble版本,所以直接安装sudo apt install ros-humble-realsense2-*即可。
参考ubuntu20.08下获取realsense内参(使用ros功能包):我们需要用 type-c 3.0 (必须 3.0 哈)的 USB 线连接摄像头和电脑,运行命令 ros2 run realsense2_camera realsense2_camera_node 即可将当前相机加入 ROS 中的节点,然后通过 ros2 topic list 查看当前节点相关的话题,我们可以看到如下这些话题,再开个新的终端执行 ros2 topic echo /camera/color/camera_info 获取到当前相机相关参数,其中内参矩阵为 k 后面的 9 个参数,分别为 的内参矩阵横向展开的结果。
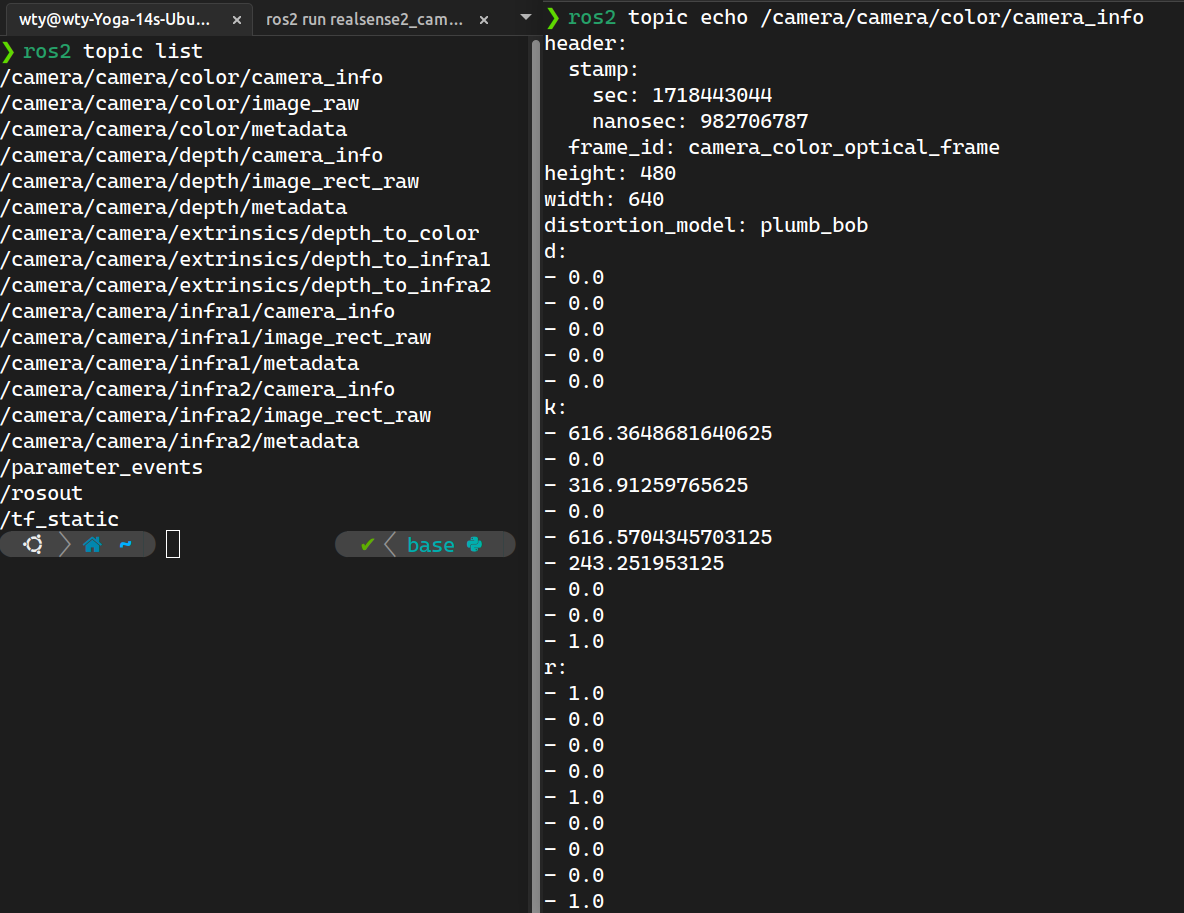
例如上图中,我的相机内参矩阵就是 k=[[616.3648681640625,0.0,316.91259765625],[0.0,616.5704345703125,243.251953125],[0.0,0.0,1.0]]: